Near Zero-Change Fabric Migration: Moving Projects Between Tenants with Azure Blob Storage
 By WebSiteAdmin
August 11, 2026
14 min read
By WebSiteAdmin
August 11, 2026
14 min read
Every data engineer who has built a production solution on Microsoft Fabric knows the effort involved: carefully designed pipelines, fine-tuned Dataflow Gen2 transformations, and a warehouse schema built to last. Now imagine being asked to move all of that to a completely different Azure tenant.
This scenario is more common than you might expect. Companies restructure, merge, or consolidate Azure environments — and when they do, entire Fabric projects need to follow. The challenge is making the move without losing any of the work you have already invested.
This blog introduces the Near Zero-Change Migration approach: a structured, phase-by-phase method for migrating a Fabric project from Tenant A (Old) to Tenant B (New) while keeping the architecture completely identical. The source remains Azure Blob Storage and the destination remains a Fabric Warehouse — nothing changes except the environment.
Why This Matters
As a data engineer, tenant migrations are not just copy-paste operations. You need to:
- Preserve pipeline logic without rebuilding from scratch
- Reconnect all data sources and destinations in the new tenant context
- Recreate the warehouse schema — tables and stored procedures — accurately
- Update security and authentication configurations for the new tenant
- Validate everything before going live
Understanding the right sequence and the specific modifications required at each step is what separates a smooth migration from hours of debugging and rework.
Migration Overview
This guide covers three phases:
- Phase 1: Migrating Pipelines and Dataflow Gen2 using the Fabric Import/Export feature
- Phase 2: Migrating Warehouse Tables and Stored Procedures via SSMS
- Phase 3: Addressing Security and Authentication changes
- Phase 4: Post-migration validation and review
- Limitations: Non-portable items to be aware of before you start
Migration Architecture Flow
The diagram below illustrates the end-to-end migration journey — from the source in Tenant A through each phase to the final validated destination in Tenant B.
| Azure Blob Storage Source | Tenant A | → | Phase 1 Pipelines & Dataflow Gen2 | → | Phase 2 Warehouse via SSMS | ||
| Tenant A — Existing Project | Import / Export & Reconnect | Script / Execute | ||||
| ↓ | ||||||
| Phase 3 Security & Authentication | → | Phase 4 Post-Migration Validation | → | Fabric Warehouse Destination | Tenant B | ||
| Reconfigure Identities & RBAC | Test & Confirm End-to-End | Tenant B — Validated Project |
Figure: Near Zero-Change Migration flow — Azure Blob Storage (Tenant A) through Phases 1–3 to Fabric Warehouse (Tenant B)
Phase 1: Migrating Pipelines and Dataflow Gen2
Overview
Microsoft Fabric includes a built-in Import/Export feature for workspace items. This is the most efficient way to move Data Pipelines and Dataflow Gen2 components across tenants without manually recreating every activity, transformation, or configuration.
Step 1: Export from Tenant A
Begin by exporting Dataflow Gen 2 and Pipeline from the source workspace in Tenant A:
- Navigate to your Fabric Workspace in Tenant A.
- Locate each Pipeline and Dataflow Gen2 component you want to migrate.
- Click the (…) context menu next to the item and select Export. This generates a .zip package file containing all definitions and metadata.
- Save all exported packages to a local folder. Use a clear naming convention — for example: Pipeline_IngestBlob_v1.zip.
Note :-
There is another way to Export Pipeline and Dataflow Gen 2:
Export Pipeline from Source Tenant
Microsoft Fabric provides a native export option for Pipelines.
Steps:
- Open your Pipeline in the source workspace.
- Select the Export option from the pipeline menu.

- Fabric generates a ZIP file containing:
- Pipeline definition
- Activity configuration
- References to linked services and destinations
This ZIP file is your portable pipeline artifact.
Export Dataflow Gen2 from Source Tenant
Dataflow Gen2 also supports direct export.
Steps:
- Open the Dataflow Gen2 in the source workspace.
- Select Export.

- Fabric generates a .pqt file.
The .pqt file contains:
- Power Query transformations
- Source references
- Destination metadata
Step 2: Import into Tenant B
- Switch to Tenant B and open the destination Fabric Workspace. Create one if it does not exist yet.
- Click New Item and Create whichever the item you want to import whether it is Pipeline or Dataflow Gen2.
Import Pipeline to Destination Tenant
Once you have the ZIP file:
Steps:
- Navigate to the target workspace in the destination tenant.
- Choose Import Pipeline.

- Upload the exported ZIP file.
- Fabric creates the pipeline structure in the new workspace.
Important:
The pipeline is imported without active credentials or validated dependencies. This is expected behavior.
Import Dataflow Gen2 to Destination Tenant
Steps:
- In the destination workspace, create a new Dataflow Gen2.
- Choose the Import / Upload option.
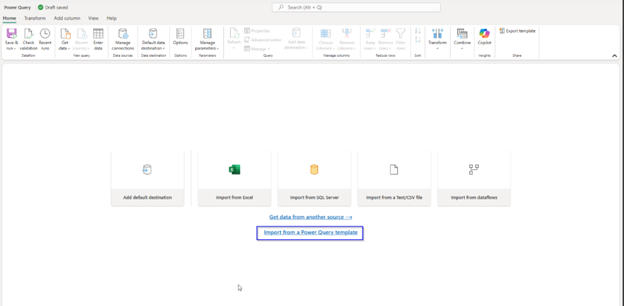
- Upload the exported .pqt file.
- Fabric recreates the Dataflow logic.
Again, the structure is restored—but connections and destinations must be reconfigured.
- Select Import and upload the .zip package exported from Tenant A.
- Repeat this process for all Pipelines and Dataflow Gen2 items.
Step 3: Reconfigure Connections
This is the step that is most often underestimated. Importing the items carries over the structure — but all connection references still point to Tenant A. Every connection must be manually updated in Tenant B.
Important: Skipping the connection reconfiguration step will cause all Pipelines and Dataflows to fail at runtime, often with authentication or resource-not-found errors.
Reconfiguring the Azure Blob Storage Source Connection
- Open each imported Dataflow Gen2 in the Fabric editor.
- Navigate to the Query Settings or Source step.
- Click Edit Connection and create a new connection pointing to the same Azure Blob Storage account using Tenant B credentials (Storage Account Name, SAS Token or Managed Identity, Container Name).
- Validate the connection and confirm the data preview loads correctly before saving.
Reconfiguring the Fabric Warehouse Destination Connection
- Open each Pipeline in the Pipeline editor.
- Locate any Copy Activity or Lookup Activity that references the old Fabric Warehouse.
- Update the Linked Service or connection to point to the new Fabric Warehouse in Tenant B.
- Repeat this for all Dataflow Gen2 destination outputs that write to warehouse tables.
- Save and publish all changes.
Tip: Test each Pipeline individually after reconnecting before proceeding to Phase 2. This confirms your orchestration layer is healthy before you bring the warehouse schema online.
Phase 2: Migrating the Warehouse via SSMS
Overview
Your Fabric Warehouse contains two categories of objects that need to migrate: Tables (schema and structure) and Stored Procedures. Both are identical in name and structure across tenants — the goal is simply to recreate them in the new environment accurately.
SQL Server Management Studio (SSMS) is the right tool for this task. It allows you to script out warehouse objects from Tenant A and execute them against the new Tenant B warehouse endpoint. Microsoft Fabric Warehouses expose a SQL connection endpoint that is fully compatible with SSMS.
Step A: Extract the Schema from Tenant A
- Open SSMS and connect to the Fabric Warehouse in Tenant A using the SQL connection endpoint from Fabric Portal > Warehouse Settings.
- In the Object Explorer, expand Databases > [Your Warehouse] > Tables.
- Right-click on the database or each table and select Script Table as > CREATE To > File.
- Save each script as a .sql file to your local machine. Use a naming convention such as Table_dbo_SalesData.sql.
- Repeat this for all Stored Procedures under Programmability > Stored Procedures.
Tip: You can also right-click the database and use Tasks > Generate Scripts to script all objects at once. Select Schema only to avoid exporting data.
Step B: Connect SSMS to Tenant B’s Warehouse
- Go to the Fabric Portal in Tenant B and open the new Warehouse.
- Copy the SQL Connection String from the Warehouse overview page or Workspace Settings.
- Open a new SSMS connection using this endpoint, authenticate with your Tenant B credentials, and verify you can browse the currently empty warehouse.
Step C: Open the CREATE Scripts for Tables
- Open the .sql files you extracted from Tenant A in the SSMS query editor.
- Review the scripts. You will notice that fully qualified object references include the old warehouse name as a prefix — for example: [OldWarehouseName].[dbo].[TableName].
Step D: Find and Replace the Warehouse Name Prefix
This is the most important modification step in the entire migration. The scripts from Tenant A embed the old warehouse name prefix in all object references. Executing them without modification in Tenant B will result in errors.
- In SSMS or your preferred text editor, open Find and Replace (Ctrl + H).
- In the Find field, enter the old warehouse prefix exactly as it appears in the scripts:
[OldWarehouseName].
- In the Replace field, enter the new Tenant B warehouse prefix:
[NewWarehouseName].
- Replace All occurrences across every script file.
- Visually inspect a few scripts to confirm the replacement was applied correctly throughout.
Step E: Execute the Modified Table Scripts
- Open each modified table script in SSMS, ensuring you are connected to the Tenant B Warehouse.
- Verify the active database context at the top of the query window points to the correct new warehouse.
- Execute the script (F5 or the Execute button).
- After execution, expand Tables in the Object Explorer and confirm all tables appear in Tenant B’s warehouse.
- Repeat until all table creation scripts have been executed successfully.
Step F: Repeat for Stored Procedures
Follow the exact same Extract > Modify Prefix > Execute process for all Stored Procedures:
- Open the SP scripts exported from Tenant A.
- Apply the same Find and Replace to swap the old warehouse name prefix for the new one.
- Execute each modified SP script in the Tenant B Warehouse via SSMS.
- Verify all Stored Procedures appear under Programmability > Stored Procedures in the Object Explorer.
Tip: If any Stored Procedures reference cross-database objects or external sources, search for those references too during the Find and Replace step to avoid broken dependencies.
Phase 3: Security & Authentication Changes
Overview
One of the most overlooked aspects of a cross-tenant Fabric migration is the security layer. Even when the data architecture is identical, identities, credentials, and access policies are always tenant-specific and cannot be exported. Every item below must be recreated or reconfigured manually in Tenant B.
Key principle:
No identity, credential, or RBAC assignment from Tenant A survives the migration automatically. Plan your security reconfiguration in parallel with the technical migration — do not treat it as an afterthought.
Service Principals
- Service principals registered in Tenant A’s Azure Active Directory (Entra ID) do not exist in Tenant B.
- Register a new Service Principal in Tenant B’s Entra ID for each application or automated process that needs access to Fabric or Azure Blob Storage.
- Update all Pipeline and Dataflow connection credentials to use the new Tenant B Service Principal (App ID + Secret or Certificate).
- Grant the new Service Principal the appropriate Fabric workspace roles (Member, Contributor, or Admin) in Tenant B.
Managed Identities
- If your pipelines used a System-assigned Managed Identity tied to a Fabric capacity or Azure resource in Tenant A, that identity is not portable.
- Create and assign a new Managed Identity in Tenant B for any Azure resources (e.g. Azure Data Factory, Azure Functions) that interact with your Fabric environment.
- Re-grant access: assign the new Managed Identity Storage Blob Data Reader (or higher) on the Azure Blob Storage account in Tenant B’s subscription.
Role-Based Access Control (RBAC)
- All Fabric workspace role assignments (Admin, Member, Contributor, Viewer) from Tenant A must be manually recreated in Tenant B.
- Review and apply Azure RBAC on the storage account — ensure that Tenant B users and service accounts have the correct roles.
- Use the Fabric Admin Portal to audit workspace permissions after migration and remove any stale or over-privileged assignments.
Azure Key Vault Integration
- If connection strings, SAS tokens, or secrets were stored in an Azure Key Vault under Tenant A’s subscription, these must be recreated in a Tenant B Key Vault.
- Create a new Key Vault in Tenant B (or use an existing one) and add all required secrets.
- Update any Pipeline parameters or Linked Services that reference Key Vault secrets to point to the new vault URI and secret names.
- Grant the relevant Service Principals and Managed Identities Key Vault Secrets User access in Tenant B.
Connection Credentials Checklist
Before go-live, verify the following credentials have been reconfigured for Tenant B:
- Azure Blob Storage: Storage Account Key, SAS Token, or Managed Identity assignment
- Fabric Warehouse: SQL endpoint, workspace authentication, and connection string
- Dataflow Gen2 connections: all data source and destination credentials
- Pipeline Linked Services: all references updated from Tenant A to Tenant B identities
- Scheduled trigger identities: confirm triggers run under a Tenant B-valid identity
Phase 4: Post-Migration Validation & Review
Why Validation Matters
A migration is not complete until you have verified that every component works end-to-end in the new tenant. A successful import or script execution does not guarantee correct runtime behavior. Always validate before declaring the migration done.
Recommended Validation Checks
Test-Run a Pipeline
- Trigger one of the imported Pipelines manually from the Fabric Pipeline editor.
- Monitor the run via the Activity Monitor or Pipeline Run History.
- Confirm all activities complete with a Succeeded status and no warnings.
Verify Row Counts
- After a successful Pipeline run, query the target warehouse tables to check row counts:
SELECT COUNT(*) FROM [NewWarehouseName].[dbo].[YourTable]
- Compare counts against what you expect based on Tenant A’s data volumes.
Verify Dataflow Gen2 Output
- Run each Dataflow Gen2 individually and check its refresh history.
- Confirm the data preview at each transformation step reflects the expected output.
- Check that the destination load completed without errors.
Test Stored Procedure Execution
- Execute one or more Stored Procedures from SSMS or via the Fabric SQL endpoint:
EXEC [NewWarehouseName].[dbo].[YourStoredProcedure]
- Review the result set and confirm it matches expected behavior.
Final Connection Audit
- Open every Pipeline and every Dataflow Gen2 in Tenant B one final time.
- Confirm that no connection or linked service still references Tenant A.
- Check that all scheduled triggers, if any, are re-enabled and configured correctly for Tenant B.
Recommendation: Run the full pipeline end-to-end at least once with a fresh dataset from Azure Blob Storage. This confirms the entire data flow — from source ingestion through to warehouse population — works correctly in the new tenant.
Limitations: Non-Portable Items
What This Migration Does Not Cover
The Near Zero-Change Migration approach described in this guide works well for Pipelines, Dataflow Gen2, and Warehouse schema. However, several Fabric and Azure components are tenant-specific and cannot be migrated using the Import/Export or scripting approach. Be aware of these limitations before you begin.
Before you start:
Review this list carefully with your team. Items flagged as non-portable will require separate rebuild effort in Tenant B and should be scoped into your migration project plan.
Power BI Semantic Models and Reports
- Power BI semantic models (datasets) are tied to a specific workspace and tenant. They cannot be exported and re-imported via the Fabric Import/Export mechanism.
- Reports and dashboards must be republished from Power BI Desktop or rebuilt in Tenant B.
- All data source credentials within semantic models must be re-entered manually.
- Row-Level Security (RLS) rules must be re-applied and re-tested in Tenant B.
On-Premises Data Gateways
- Data gateways registered in Tenant A are not transferable to Tenant B.
- Install and register a new gateway in Tenant B if your pipelines or dataflows connect to any on-premises data sources.
- Re-associate all relevant data source connections with the new gateway.
Tenant-Specific Capacity and Licensing Settings
- Fabric capacity SKUs, capacity assignments, and billing are scoped to a tenant and subscription. These must be set up independently in Tenant B.
- Workspace-to-capacity assignments must be recreated manually.
- Any Fabric Admin tenant settings (allowed domains, external sharing policies, certification settings) must be reconfigured by the Tenant B admin.
Git Integration and DevOps Connections
- Git repository connections configured in Tenant A workspaces (Azure DevOps or GitHub integrations) are not carried over by the Import/Export process.
- Reconnect workspaces to the appropriate Git repositories in Tenant B and re-sync branches as needed.
Endorsements and Certifications
- Item-level endorsements (Promoted, Certified) assigned in Tenant A are not migrated.
- Reapply endorsements in Tenant B after confirming item quality and compliance.
Conclusion
Migrating a Microsoft Fabric project across tenants is entirely manageable when you break it down into clear, structured phases. By using the native Import/Export feature for Pipelines and Dataflow Gen2, and leveraging SSMS with a straightforward Find and Replace strategy for your warehouse schema, you can achieve a clean Near Zero-Change Migration — preserving your exact architecture while shifting to a new environment.
The key principles to carry forward from this guide:
- Never skip connection reconfiguration after importing Pipelines and Dataflows — the structure moves, but the connections do not.
- Always replace warehouse name prefixes in your table and stored procedure scripts before executing them in the new tenant.
- Know your non-portables — Power BI semantic models, gateways, capacity settings, and Git integrations require separate attention outside this migration flow.
- Validate thoroughly — a successful migration is proven by working data flows, not just successful imports.
This methodical approach saves hours of rework and gives you the confidence that your new Fabric environment is a production-ready replica of what you built in Tenant A.