Deploying a Custom Favicon to Modern SharePoint Sites Using SPFx
 By Vishwa Chaturvedi
September 19, 2026
6 min read
By Vishwa Chaturvedi
September 19, 2026
6 min read
Introduction
Branding plays a crucial role in creating a professional and recognizable SharePoint experience. While SharePoint Online provides extensive customization capabilities, replacing the default browser favicon isn’t something that can be achieved through site settings alone.

Recently, I had a requirement to display a custom favicon on a modern SharePoint site without affecting other sites in the tenant. The solution needed to be:
- Site-specific rather than tenant-wide
- Easy for administrators to deploy
- Independent of hardcoded URLs
- Flexible enough to work across different SharePoint sites
To accomplish this, I built a lightweight SharePoint Framework (SPFx) Application Customizer that dynamically loads a favicon from the site’s Site Assets library.
In this Blog, I’ll walk through the complete implementation from setting up the development environment with the required tools to deploy and troubleshoot the solution.
Solution Overview
The solution uses an SPFx Application Customizer, which executes whenever a modern SharePoint page loads.
Instead of referencing a fixed URL, the extension dynamically determines the current site’s URL using the SharePoint page context and constructs the favicon path automatically.
The implementation follows this simple flow:
- User opens a modern SharePoint site.
- The SPFx Application Customizer loads.
- The current site URL is retrieved.
- The extension looks for Site Assets/favicon.ico.
- Existing SharePoint favicon references are removed.
- A new favicon is injected into the page.
- The favicon is reapplied during modern page navigation.
This approach makes the solution portable and reusable across multiple SharePoint sites without modifying the source code.
Prerequisites
Before creating the solution, we need to do the following things.
Install Node Version Manager (NVM)
Using NVM makes it easy to manage different Node.js versions required by SPFx projects.
Install NVM for Windows / IOS from the official releases page.
Install Node.js
After installing NVM, install Node.js version 22.
nvm install 22
nvm use 22.2.0
Verify the installation:
node -v
Expected output:
v22.x.x
Install SPFx Development Tools
Install the SharePoint Framework Yeoman generator globally.
npm install -g yo @microsoft/generator-sharepoint
Creating the SPFx Project
Create a new SharePoint Framework solution.
mkdir spfx-dynamic-favicon
cd spfx-dynamic-favicon
yo @microsoft/sharepoint
Provide the following configuration during project creation:
| Setting | Value |
| Solution Name | spfx-dynamic-favicon |
| Component Type | Extension |
| Extension Type | Application Customizer |
| Extension Name | SiteFavicon |
Once the generator completes, the project structure is ready.
Building the Application Customizer
Navigate to the following file:
src/extensions/siteFavicon/SiteFaviconApplicationCustomizer.ts
The customizer extends BaseApplicationCustomizer and executes whenever a SharePoint page loads.
The implementation performs four key tasks:
- Retrieves the current site’s URL.
- Dynamically builds the favicon path.
- Remove SharePoint’s default favicon.
- Injects the custom favicon into the document.
One of the biggest advantages of this implementation is that it avoids hardcoded URLs entirely.
The favicon path is generated dynamically using:
const currentSiteUrl = this.context.pageContext.web.absoluteUrl;
const dynamicFaviconPath =
`${currentSiteUrl}/SiteAssets/favicon.ico?v=${new Date().getTime()}`;
Appending the timestamp acts as a cache-busting mechanism, ensuring browsers fetch the latest version instead of displaying a cached favicon.
Next, the extension removes any existing favicon references before adding the new one.
const defaultIcons = document.querySelectorAll(
“link[rel=’shortcut icon’], link[rel=’icon’]”
);
Finally, the custom favicon is injected into the page header.
To support SharePoint’s modern page navigation (which often doesn’t perform a full page refresh), the extension also registers for the navigatedEvent, ensuring the favicon is reapplied whenever users navigate between pages.
Configuring Site-Level Deployment
Open:
config/package-solution.json
Update the following property:
“skipFeatureDeployment”: false
This setting allows administrators to install the solution on selected SharePoint sites rather than deploying it globally across the tenant.
This provides greater flexibility and better control over where the customization is applied.
Building and Packaging the Solution
Once development is complete, build the production package.
npx heft build –production
npx heft package-solution –production
The generated package is created at:
sharepoint/solution/spfx-dynamic-favicon.sppkg
This package is ready for deployment to the SharePoint App Catalog.
Deploying the Solution
Upload the generated .sppkg package to the SharePoint App Catalog.
When prompted, choose:
Only enable this app
This makes the solution available for installation without enabling it across every site collection.
Installing the Solution on a Site
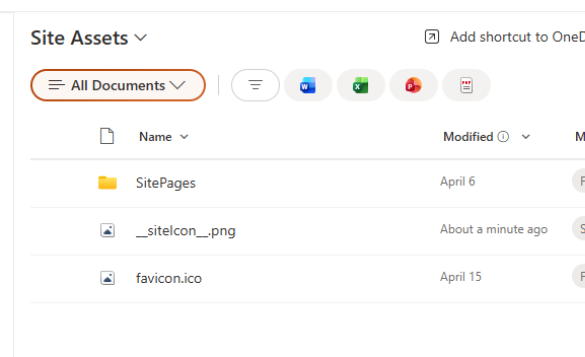
Step 1: Upload the Favicon
Navigate to:
Site Contents → Site Assets
Upload your custom favicon with the exact filename:
favicon.ico
Since the Application Customizer dynamically references this location, no code changes are required for different sites.
Step 2: Install the SPFx App
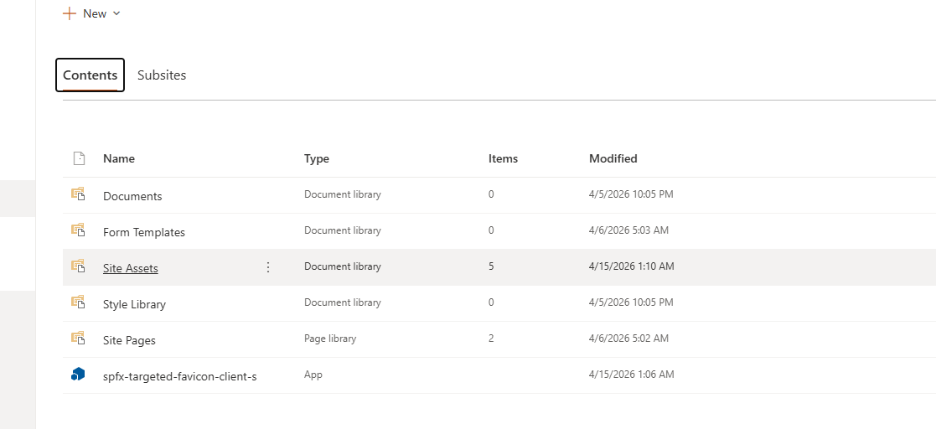
Navigate to:
Site Contents → New → App → From Your Organization
Install:
spfx-dynamic-favicon-client-side-solution
After installation, perform a hard refresh (Ctrl + Shift + R) or open the site in an Incognito/Private browser window.
Your custom favicon should now appear in the browser tab.
Troubleshooting
Favicon Doesn’t Update
This is usually caused by browser caching.
Possible solutions include:
- Perform a hard refresh.
- Open the site in an Incognito window.
- Clear browser cache if necessary.
App Doesn’t Appear in “From Your Organization”
If the package isn’t immediately visible:
- Wait approximately 15–20 minutes for SharePoint propagation.
- Verify that custom scripts are enabled.
Navigate to:
SharePoint Admin Center → Policies → Sharing
Enable:
Allow users to run custom scripts
Keep in mind that this setting can take several hours to propagate throughout the tenant.
Build Errors
First, verify the Node.js version:
node -v
If dependency issues occur, reinstall project packages:
rm -rf node_modules package-lock.json
npm install
Updating the Solution
Whenever code changes are made, increment the version number in:
package-solution.json
Example:
“version”: “1.0.1.0”
Rebuild and package the solution again.
npx heft build –production
npx heft package-solution –production
Upload the new package to the App Catalog and choose Replace when prompted.
Conclusion
Although replacing a favicon might seem like a minor customization, it can significantly improve the branding and professionalism of modern SharePoint sites.
By leveraging an SPFx Application Customizer, we created a lightweight, reusable, and site-specific solution that:
- Eliminates hardcoded URLs
- Uses the site’s own Site Assets library
- Works seamlessly with modern SharePoint navigation
- Supports selective deployment across individual sites
- Remains easy to update and maintain
Whether you’re building branded intranet portals or customer-facing SharePoint sites, this approach provides a clean and scalable way to customize the browser experience without impacting the rest of your SharePoint environment.