Connecting Business Central with Dataverse and Power BI: A Comparative Analysis of Integration Approaches
 By Vedant Chauhan
October 8, 2026
11 min read
By Vedant Chauhan
October 8, 2026
11 min read
1. Introduction
Microsoft Dataverse is the underlying data platform for the Microsoft Power Platform. It stores and manages the data used by Power Apps, Power Automate, and Power BI, and provides a secure, structured set of tables that can be shared across applications and business processes.
Business Central and Dataverse are built on separate data platforms and do not share data automatically. Where an organization builds Power Apps or automated workflows on top of Dataverse, but the source data – such as vendors, customers, or transactional records- resides in Business Central, that data must be deliberately brought across into Dataverse tables before it can be used.
This case study documents two supported ways of connecting Business Central to Dataverse, walks through the configuration steps for each, and compares their strengths, limitations, and suitability for different scenarios.
2. Business Scenario & Objective
The Requirement
A Power App built on Dataverse needs access to specific Business Central data – for example, the Vendor list – so that this information can be viewed, filtered, and acted upon inside the app. Since Dataverse has no native awareness of Business Central’s data, a connection must be configured to bring the required entities across.
Two Possible Approaches
Business Central offers two distinct ways to make this connection, depending on how much control is needed over the data and how current it needs to stay:
| Method | How It Works | Sync Direction |
| API & OData Connector | A Business Central API endpoint is imported into a Dataverse table using Power Query dataflows. | One-way (Business Central → Dataverse), refreshed manually or on a schedule. |
| Assisted Setup — Dataverse Connection | A built-in wizard in Business Central installs a virtual table app in Dataverse and synchronizes data automatically. | Bidirectional, kept in sync continuously. |
Both approaches are explored in detail below, using the Vendor entity as a working example.
3. Method 1 – Connecting via API and OData Connector
3.1 Prerequisites
This method relies on the OData API for the Business Central entity that needs to be brought into Dataverse. Business Central provides ready-made APIs for most entities, exposing their default (standard) fields. If the entity in question has custom fields added on top of the standard ones, a custom API page that includes those fields must be created in Business Central first, since the default API will not expose them.
On the Dataverse side, a table is needed to receive the data. This can be an existing table with matching columns, or a new table created specifically for this purpose.
3.2 Step-by-Step Process
Step 1: In Power Apps, open Tables and select New table. Three options are available: Create new tables, Table (advanced properties), and create a virtual table. For this method, choose Create new tables.
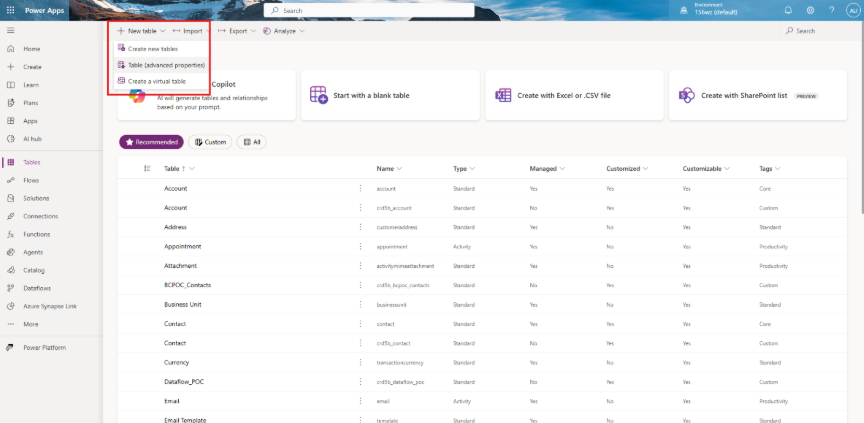
Figure 1: Creating a new table from the Tables view in Power Apps.
Step 2: Give the table a clear display name and plural name, then select Save to create it.
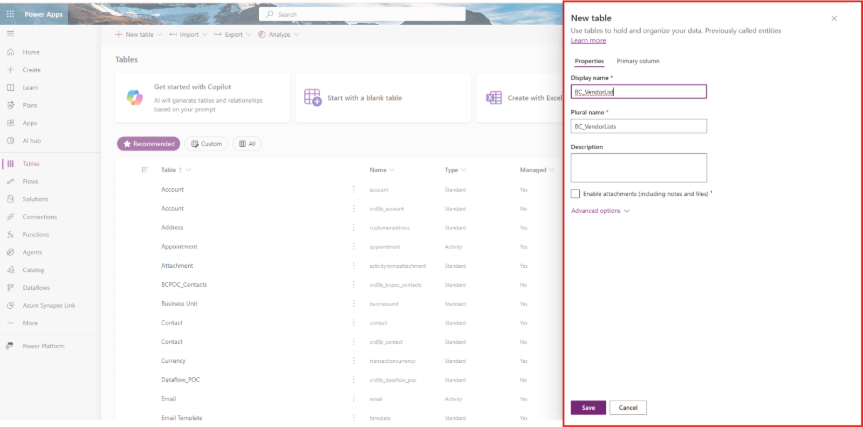
Figure 2: Naming the new table before saving.
Step 3: Once the table is created, it opens in the table view showing its columns and data. From the New menu, select Column to begin defining the fields that will hold the incoming data.
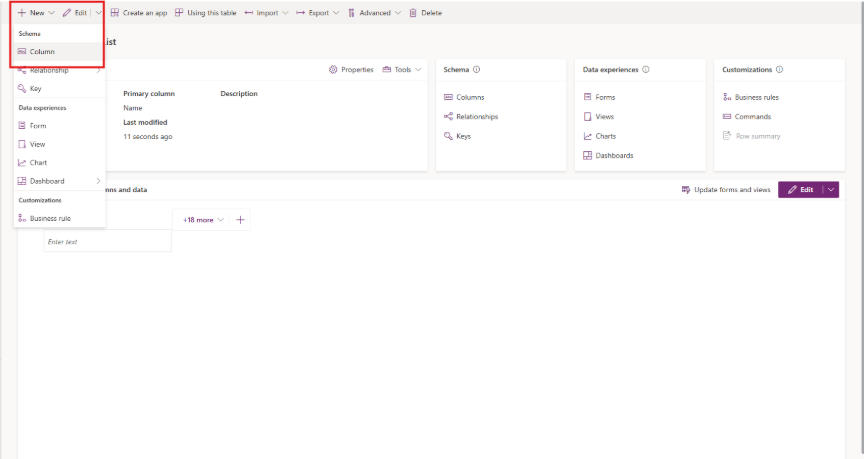
Figure 3: Adding a new column from the table view.
Step 4: In the New column panel, enter a display name and choose the appropriate data type for the field, then select Save. Repeat this step for every column required to hold the source data.
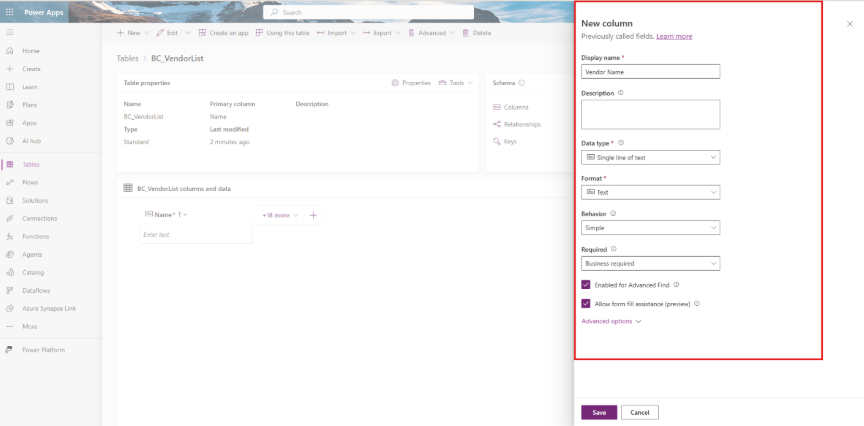
Figure 4: Configuring a new column’s display name and data type.
Step 5: With the table and its columns in place, select Import, then Import data with Dataflows to begin pulling data in from Business Central.
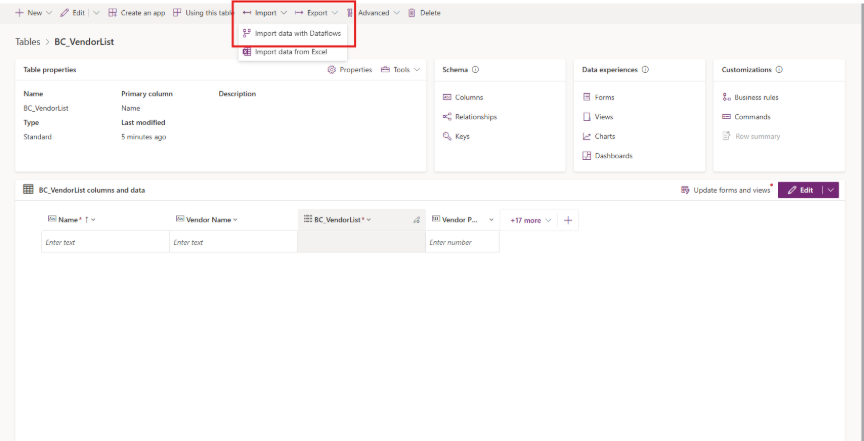
Figure 5: Starting a dataflow import from the table’s Import menu.
Step 6: In Business Central, locate the OData V4 URL for the entity to be connected. Search for Web Services, find the relevant API in the list, and copy its OData V4 URL.
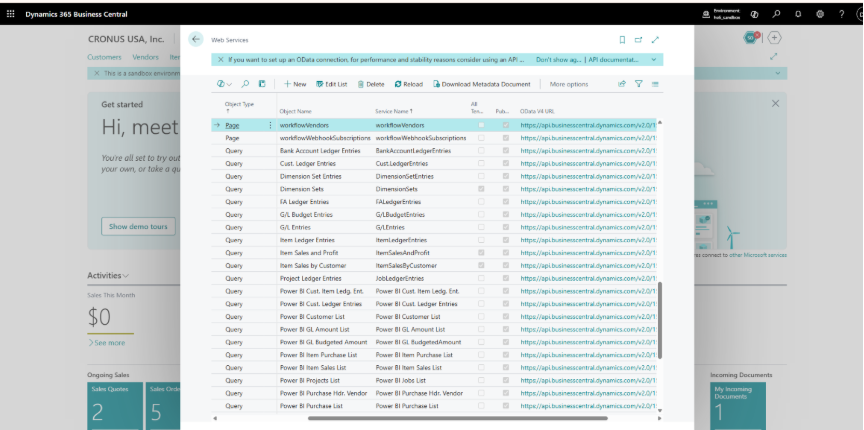
Figure 6: Locating and copying the OData V4 URL from the Web Services page in Business Central.
Step 7: Back in the dataflow wizard, select the OData connector and paste the Business Central API URL into the Connection settings, then select Next.
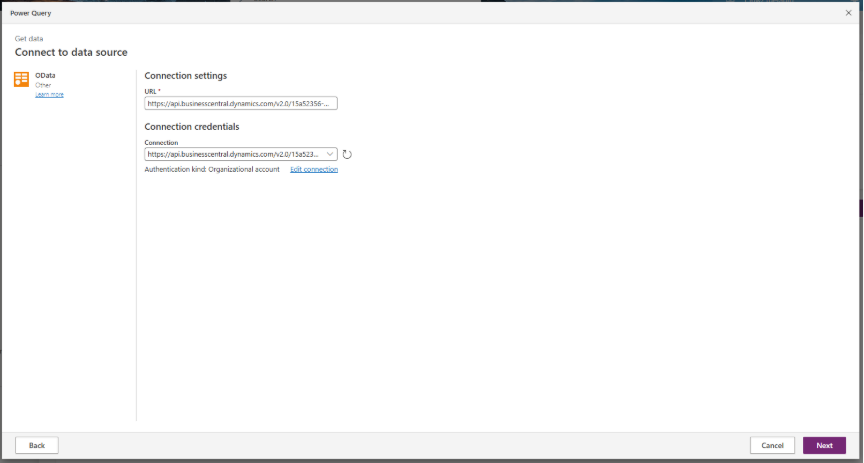
Figure 7: Connecting to the Business Central OData source.
Step 8: The data loads into Power Query, where it can be previewed and, if needed, transformed before continuing. Select Next once the data looks correct.
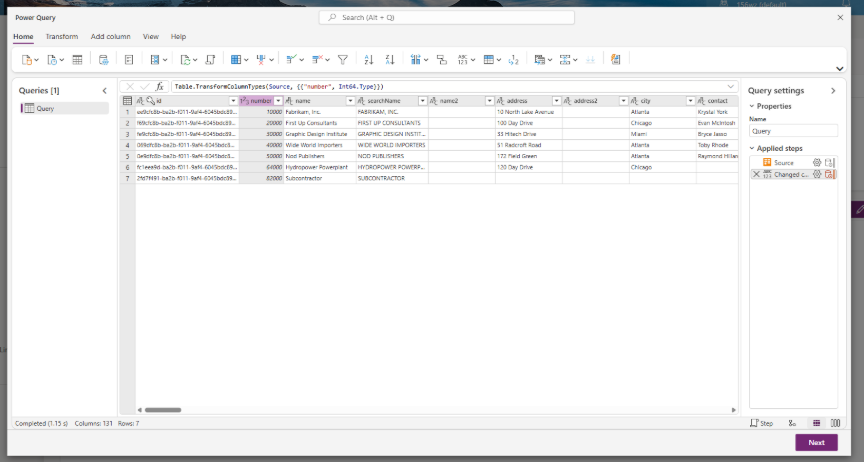
Figure 8: Previewing and transforming the incoming data in Power Query.
Step 9: On the Choose destination settings screen, select Load to existing table and choose the Dataverse table created earlier as the destination.
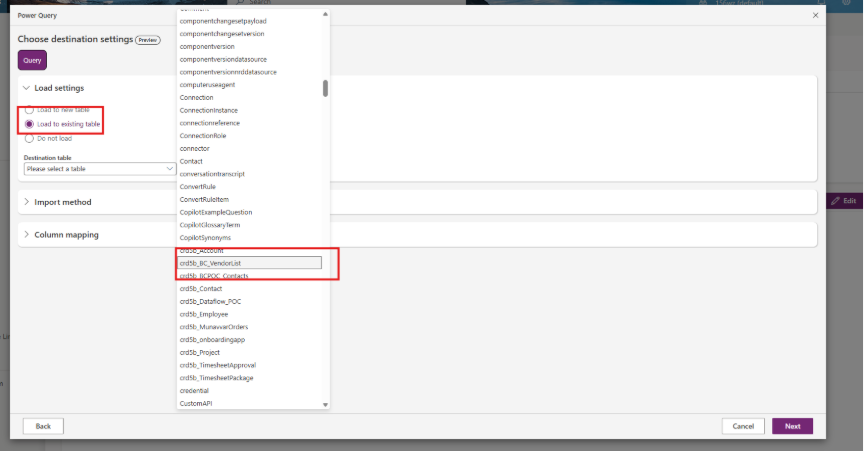
Figure 9: Selecting the existing Dataverse table as the load destination.
Step 10: Under Column mapping, match each source column from Business Central to the corresponding destination column in the Dataverse table. Use Auto map where possible, and confirm every field shows a Mapped status before proceeding.
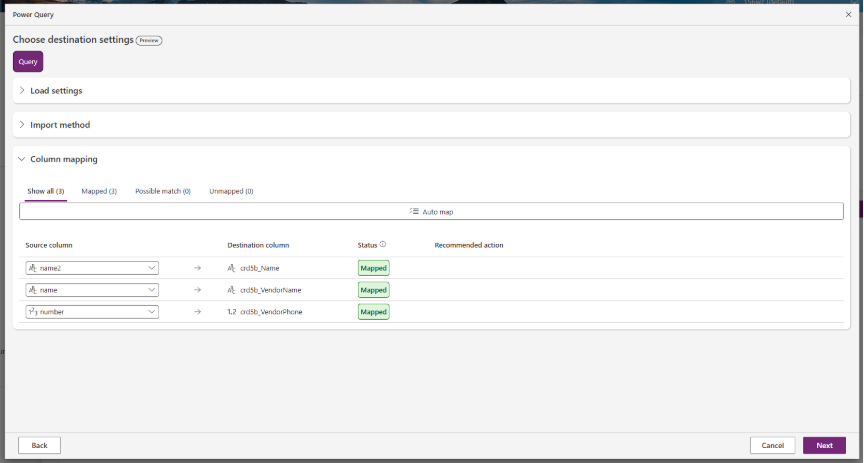
Figure 10: Mapping source columns to Dataverse destination columns.
Step 11: After publishing the dataflow, the data is loaded into the table. Open the table in Power Apps to confirm the records have populated correctly.
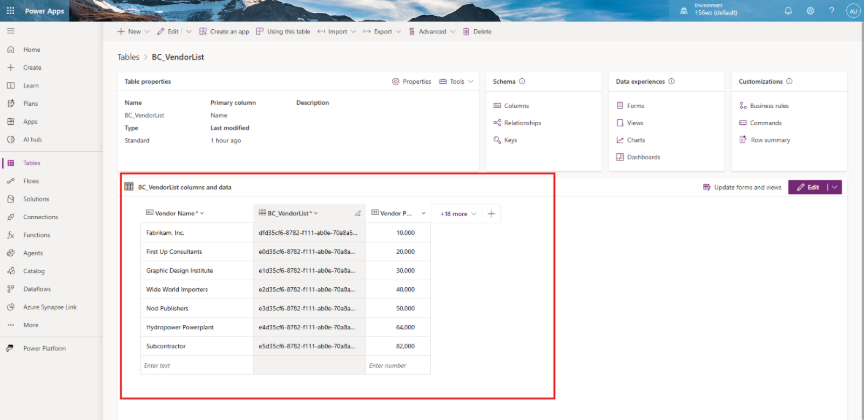
Figure 11: The Dataverse table populated with data after publishing.
Step 12: As a final check, compare the populated Dataverse table against the source records in Business Central – in this example, the Vendor list – to confirm the data matches.
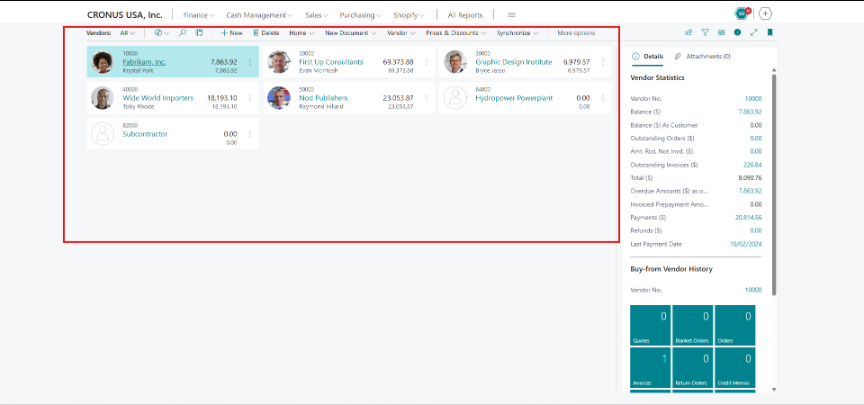
Figure 12: The source Vendor list in Business Central, used to verify the imported data.
4. Method 2 – Connecting via Assisted Setup (Native Dataverse Connection)
4.1 Overview
Business Central also provides a built-in, wizard-driven way to connect to Dataverse through its Assisted Setup options. Rather than importing data from one entity at a time, this method installs a virtual table app in the target Dataverse environment and establishes a bidirectional synchronization between the two systems.
4.2 Step-by-Step Process
Step 1: In Business Central, go to Settings, then Assisted Setup. Under the Connect with other systems section, select Set up a connection to Dataverse.
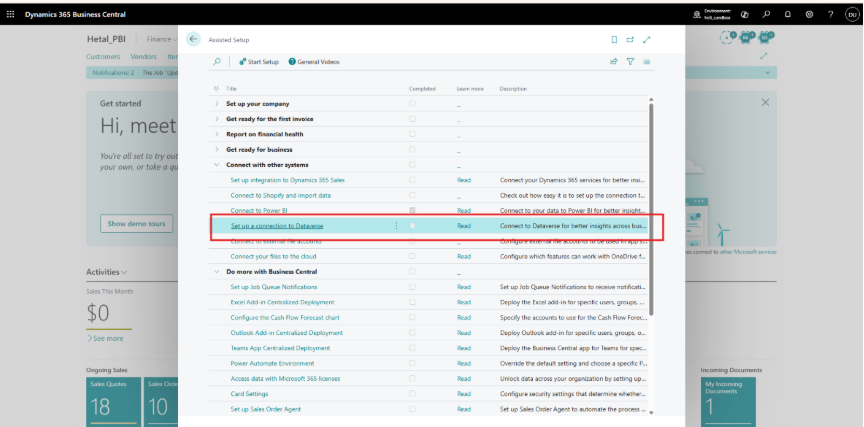
Figure 13: Locating the Dataverse connection option in Assisted Setup.
Step 2: In the Dataverse Connection Setup wizard, enable Data synchronization and Virtual tables and events, then select Next.
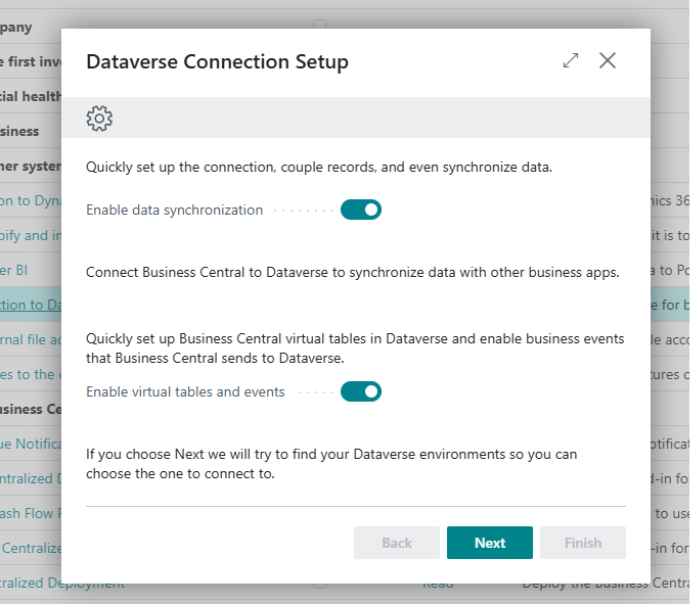
Figure 14: Enabling data synchronization and virtual tables in the setup wizard.
Step 3: Accept the terms and conditions, then choose the Dataverse environment that Business Central should connect to from the list of available environments.
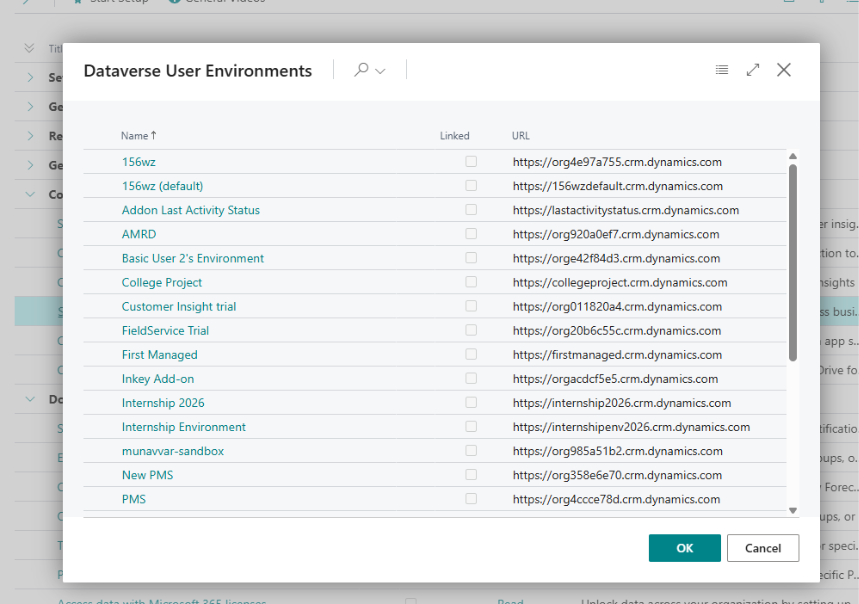
Figure 15: Selecting the target Dataverse environment.
Step 4: Install the Business Central Virtual Table app into the selected Dataverse environment from AppSource, then select Finish once installation is confirmed.
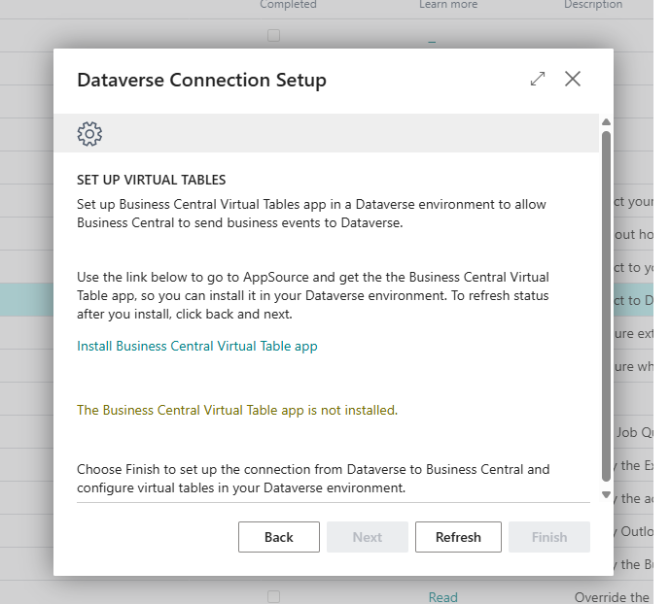
Figure 16: Installing the Business Central Virtual Table app from AppSource.
Step 5: The Dataverse Full Synchronization Review page opens automatically. After verifying the entities listed, select Sync All to begin synchronizing data with Dataverse.
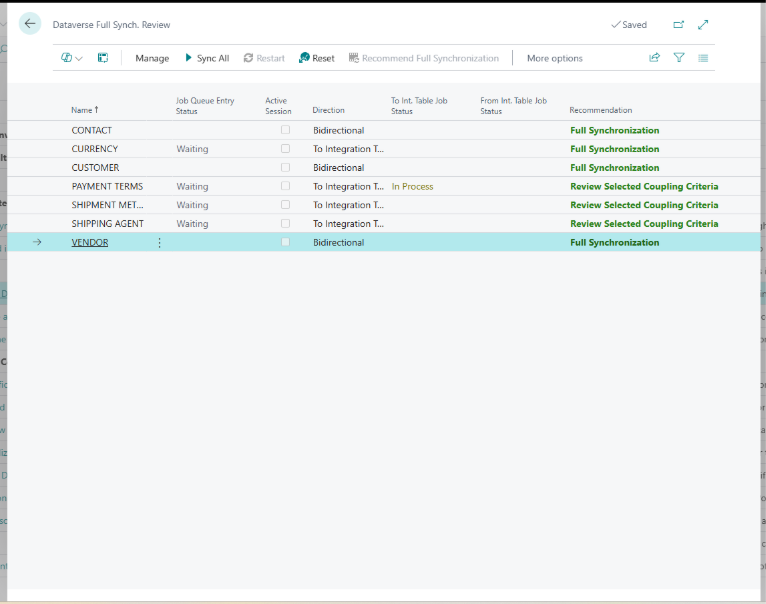
Figure 17: Reviewing entities and starting full synchronization.
Step 6: Once synchronization completes, the Business Central data appears in the corresponding Dataverse tables – for example, vendor and customer records appear in the Account table.
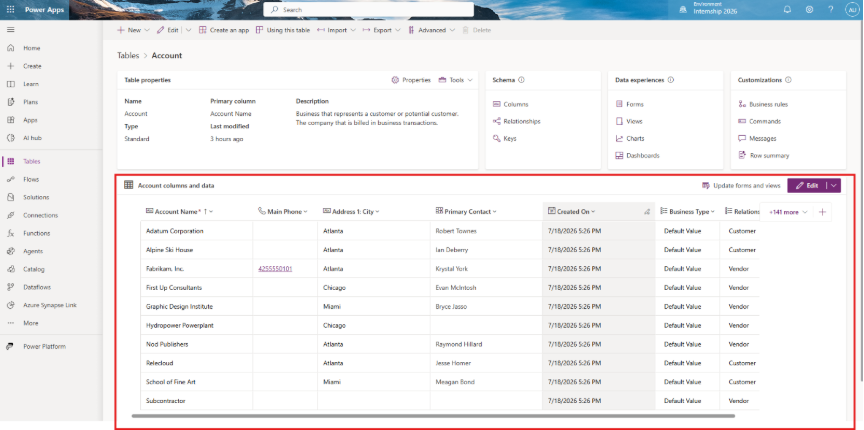
Figure 18: Business Central records visible in the Dataverse Account table after synchronization.
Step 7: The Dataverse Connection Setup page provides an overview of the active connection, including the environment URL, synchronization status, and ownership settings.
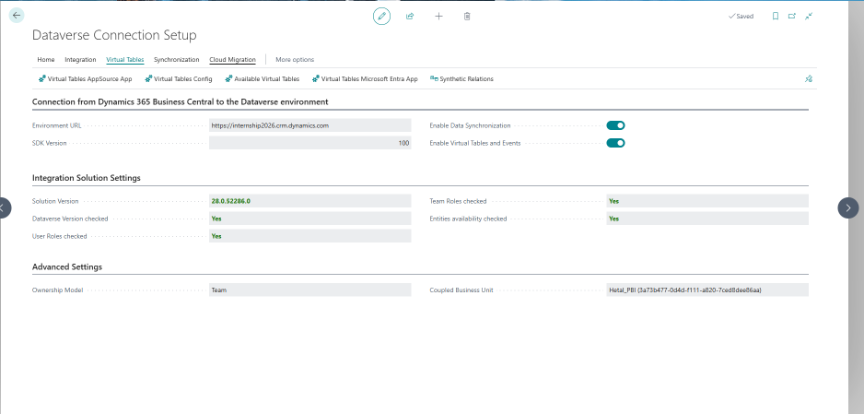
Figure 19: Reviewing the active Dataverse connection details.
Step 8: Additional Business Central entities can be connected at any time through the Available Virtual Tables view. Select the desired entity and choose Enable to create its virtual table in Dataverse.
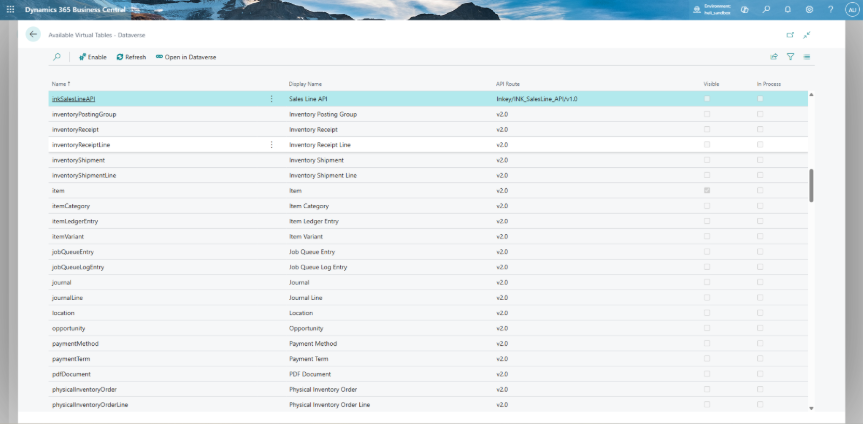
Figure 20: Enabling additional entities as virtual tables in Dataverse.
5. Connecting to Power BI
Once Business Central data exists inside Dataverse, whether through Method 1 or Method 2, the natural next question is whether that data can be picked up directly in Power BI using the default Dataverse connector. The answer depends on which method was used, because the two methods create fundamentally different kinds of tables in Dataverse.
5.1 Method 1 — Standard Dataverse Tables
The API & OData Connector approach creates a genuine Dataverse table that is physically populated with data through the Power Query dataflow. Because this is a standard Dataverse table, it behaves like any other table in the environment and can be selected directly in Power BI using the built-in Dataverse connector.
5.2 Method 2 — Virtual Tables
The Assisted Setup approach instead creates virtual tables in Dataverse — proxies that map live to Business Central data rather than storing a physical copy of it. Power BI’s default Dataverse connector is built to read standard Dataverse tables, and it does not support virtual tables. As a result, entities brought into Dataverse through Method 2 cannot be reported on directly in Power BI using the default connector.
| Method | Dataverse Table Type Created | Power BI Default Dataverse Connector |
| Method 1: API & OData Connector | Standard table, physically populated via dataflow | Supported — can be queried directly |
| Method 2: Assisted Setup | Virtual table, live-mapped to Business Central | Not supported — virtual tables are not exposed to the default connector |
6. Custom Entities — Connecting to Dataverse and Power BI
Custom entities, meaning tables or fields added specifically for a Business Central implementation, add a further consideration on top of the two connection methods described above.
6.1 Direct Connection to Power BI
Custom entities do not need to pass through Dataverse at all to reach Power BI. Business Central’s own default Power BI connector can bring custom entities into Power BI directly, independently of either method covered in this case study.
6.2 Custom Entities via Method 1 (API & OData Connector)
Custom entities can be brought into Dataverse using Method 1, since this approach works from an API URL rather than a fixed list of entities. As described in Section 3.1, a custom API page that exposes the custom fields must be created in Business Central first; once that API URL exists, it can be used in the dataflow in exactly the same way as a standard entity.
6.3 Custom Entities via Method 2 (Assisted Setup)
A virtual table can also be created for a custom entity through Method 2, but the table will not populate with data automatically. Making the connection functional requires additional development work on the Business Central side to expose the custom entity through the virtual table mechanism.
7. Comparison & Summary
Both methods succeed in making Business Central data available in Dataverse, but they differ in effort, flexibility, and ongoing maintenance:
| Aspect | Method 1: API & OData Connector | Method 2: Assisted Setup |
| Setup effort | Moderate — requires manually creating a table, columns, and column mappings. | Low — guided wizard configures the connection automatically. |
| Sync direction | One-way: Business Central to Dataverse only. | Bidirectional between Business Central and Dataverse. |
| Data refresh | Manual, or on a schedule configured for the dataflow. | Continuous, managed through the Synchronization page. |
| Custom fields | Supported, but requires building a custom API page first. | Limited to fields exposed by the virtual table app. |
| Administrative access needed | Access to Power Apps and the Business Central API. | Ability to install an app into the target Dataverse environment. |
| Best suited for | Bring specific entities or fields into a purpose-built table. | Quickly enabling standard Business Central entities across Dataverse. |
| Power BI connectivity (default Dataverse connector) | Supported — resulting table is a standard Dataverse table. | Not supported — virtual tables are not readable by the default connector. |
| Custom entity support | Supported, via a custom API page created in Business Central. | Virtual table can be created, but requires additional Business Central-side development to populate. |
8. Limitations & Considerations
- Custom fields on Business Central entities are not exposed through the default API in Method 1; a custom API page must be created before those fields can be imported.
- Method 1 produces a point-in-time snapshot of the data. Without a scheduled dataflow to refresh, the Dataverse table will not automatically stay current with changes made in Business Central.
- Column mapping in Method 1 is manual and must be revisited whenever the source or destination schema changes.
- Method 2 requires sufficient administrative or maker permissions in the target Dataverse environment to install the Business Central Virtual Table app.
- Because Method 2 synchronizes data in both directions, concurrent edits to the same record in Business Central, and Dataverse can create conflicts that need to be reviewed on the Synchronization page.
- Not every Business Central entity is available as a virtual table by default; only entities listed under Available Virtual Tables can be enabled through Method 2.
- Virtual tables created through Method 2 cannot be queried directly from Power BI using the default Dataverse connector, since that connector only reads standard Dataverse tables.
- For custom entities connected through Method 2, the virtual table is created but remains empty until additional development work is done on the Business Central side to populate it.