Performing CRUD Operations in Power Apps using Sharepoint List – Part I
Hello PowerApps Users,
PowerApps is in demand nowadays because of its remarking features such as:
- Speed of app creation. Power Apps accelerate app creation.
- Low-code and no-code.
- Microsoft and other third-party service integrations.
- Business process automation.
- Low cost of app ownership.
- AI capabilities.
- Cross-platform access and ease of deployment.
As a beginner in developing any application, the first step we do is CRUD operations. Same is the case in Power Apps.
On the internet, we have scattered information regarding CRUD operations, and hence it becomes difficult for a beginner to expedite the development by seeking information from multiple different articles.
So, to guide PowerApps beginners, we have compiled a series of blogs on CRUD Operations in Power Apps for our fellow PowerApps users:
We have segregated the blog into 5 major parts as below:
- How to Connect to different Data Sources in Power Apps.
- How to Read existing records from the Data Source. [Filter, Lookup]
- How to Create new records in the Data Source. [Using Patch method]
- How to Update & Delete existing records of the Data Source.
- How to perform CRUD operations using Edit Forms using any Data Source.
In this blog, we are focusing on Connection, as connection is the most crucial part of any implementation. Connection refers to what data source we’re using as a backend. Here, we are taking SharePoint as a connector.
Note: You can take any other connector of your convenience. And if you face any issues while connecting with your connector, feel free to post comments here. We will try our best to resolve your issue. 🙂
Scenario:
Here, we have taken a scenario where multiple Teacher logs entries of their Students’ details in the SharePoint list using Power Apps.
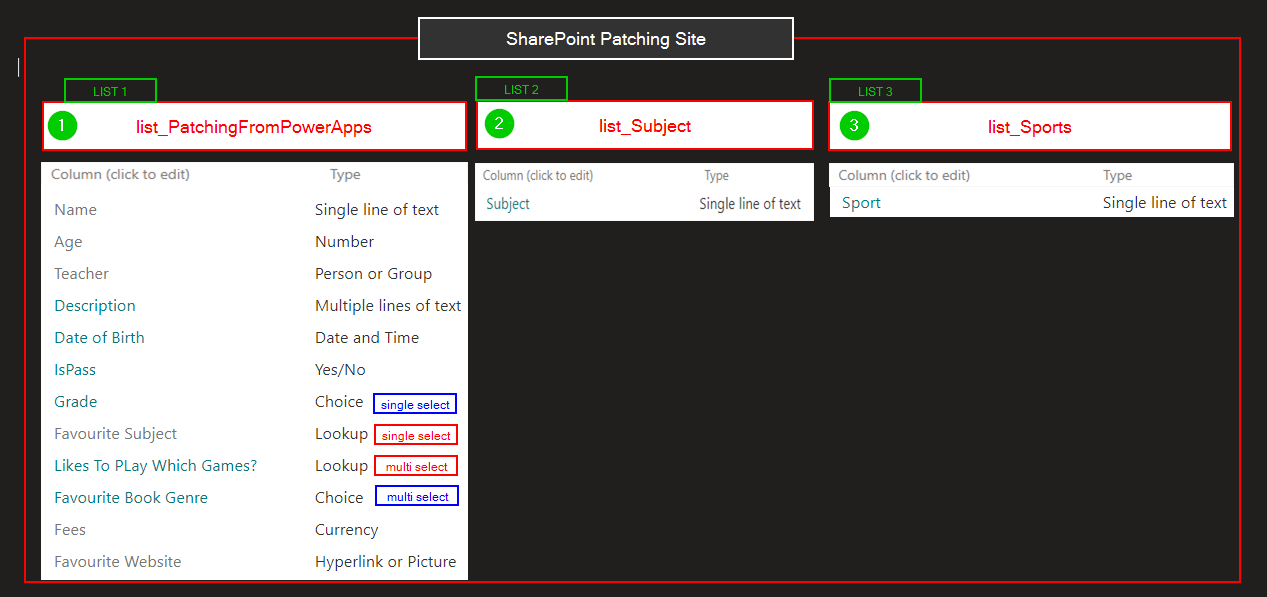
Here, we’ve created a SharePoint Site, “SharePoint Patching Site” wherein we have created 3 SharePoint lists namely:
- list_PatchingFromPowerApps (This is the main list the Teacher Creates/Updates/Deletes the entries)
- list_Subject (This is a one-column list that contains Subject column)
- list_Sports (This is a one-column list that contains Sports column)
Below is the overview of the SharePoint site and the Lists which we’ve created and going to use to perform the CRUD Operations in Power Apps.
Connecting Data Source in Power Apps:
Go to Power Apps and create a new tablet-sized Canvas App. Here, we have named it – “PowerApps SharePoint Patching App”.
To connect to data source, do as follows:
-
- Rename the Blank Screen to “scr_View”.
- Add 3 SharePoint Lists as Data Source, as mentioned above, in the Application as-
- +Add Data > Dropdown will expand and select necessary work items.
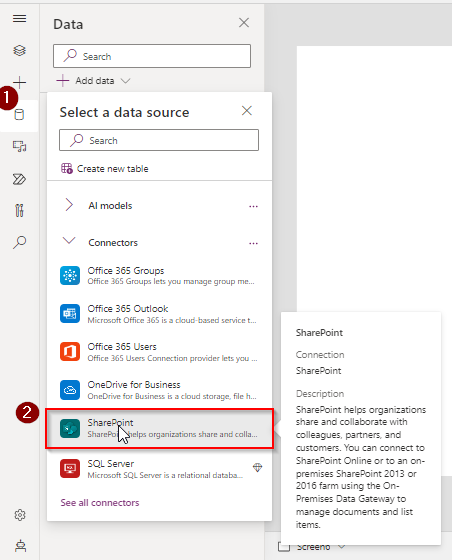
- Inside Connectors section, scroll down and click “SharePoint”
OR
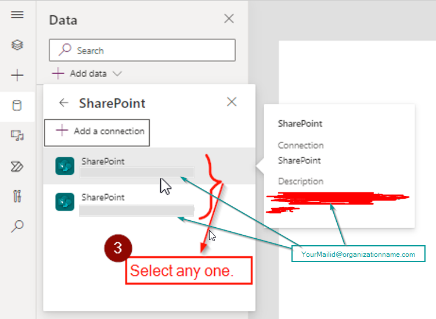
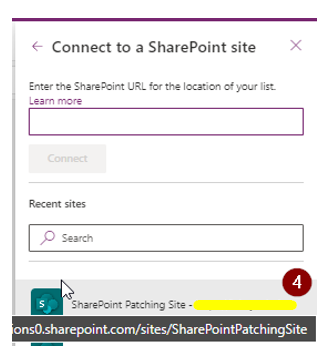
You can search “SharePoint” directly in the Search Textbox as shown in the above image. - Select any connection.
- A right navigation pane will appear, which will ask you to select the specific SharePoint Site from where you need the Lists. Here, the site is “SharePoint Patching Site”.
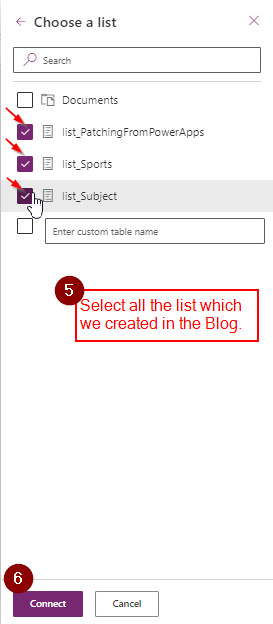
- Tick the Checkboxes of the lists you want to select and work within the application.
- Here, checkmark the checkbox of list_PatchingFromPowerApps, list_Sports, list_Subject, and press Connect.
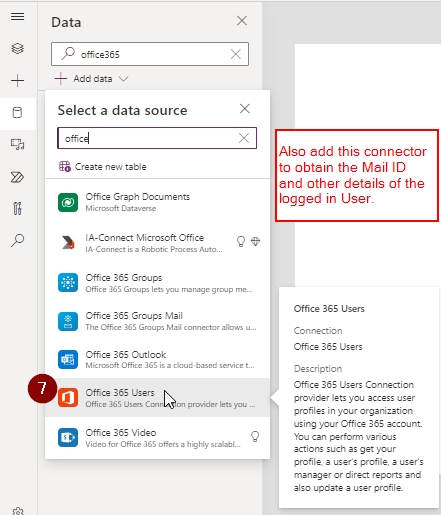
- +Add Data > Dropdown will expand and select necessary work items.
- Add Office 365 Users, in the same way, which we’ll be using in creating and updating the Person Type of Column, in a later section.
Thus, in this blog, we learned how we can connect any connectors in Power Apps and establish a proper connection at our convenience. And in our use case, we have used SharePoint & Office365 Users as connectors.
So, now, what next?
Stay tuned!
Check out the next part here!
ATM Inspection PowerApp to ease ATM inspection and report generation process.
https://inkeysolutions.com/microsoft-power-platform/power-app/atm-inspection
Insert data into Many-to-Many relationship in Dynamics CRM very easily & quickly, using the Drag and drop listbox.
http://inkeysolutions.com/what-we-do/dynamicscrmaddons/drag-and-drop-listbox
Comply your Lead, Contact, and User entities of D365 CRM with GDPR compliance using the GDPR add-on.
https://inkeysolutions.com/microsoft-dynamics-365/dynamicscrmaddons/gdpr
Create a personal / system view in Dynamics CRM with all the fields on the form/s which you select for a particular entity using the View Creator.
http://inkeysolutions.com/what-we-do/dynamicscrmaddons/view-creator