
In the previous 2 blogs of Performing CRUD Operations in Power Apps using any Data Source (part 1 and part 2), we have shown what
data source we are using, Data Model View, how to connect to any data source in Power Apps, how to read data from
any Data source.
In this blog, we will be showing:
Different methods to Create Records in Data Source from Canvas Apps:
In Canvas apps, we have 2 options for creating the data in your connected Data Source.
Forms:
Patch Function:
Create/Save the records to any data source from Power Apps.
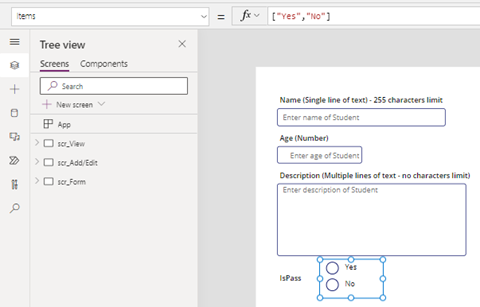
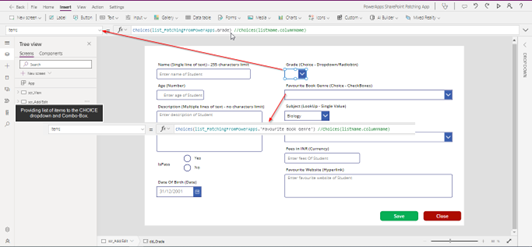
Create a blank screen and rename it to “scr_Add/Edit”. [We’ll be using this screen to Add/Update the
records present in the list_PatchingFromPowerApps]
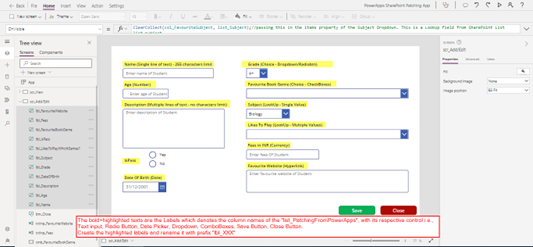
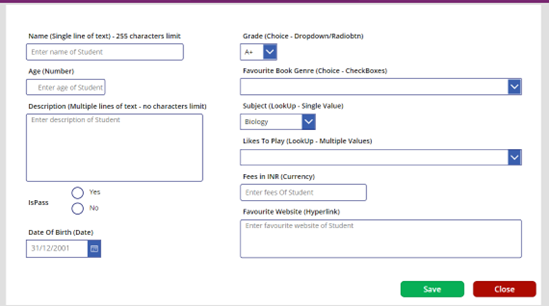
Note: Your dropdowns will be blank, by default. Ignore the ‘A+’ and ‘Biology’ value as shown in dropdowns in
the below image. You might be getting ”1” in the dropdown, it’s okay. We’ll come to that in the later section.
Note: By default, the “DefaultDate” property of the Date-Picker will show Today’s Date
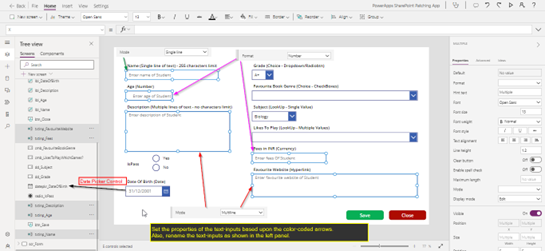
Now, step by step we’ll show how to create records for different types of Data Types. We have explained the Patch
function in 6 parts based upon different data types and its expression:
Compiled Save Code for all columns and data types.
Creating records of the following types:
Patch Function to Create Records in SharePoint List/any other data source for column types:
#Expression to create records of the 5 common data types
Patch(
list_PatchingFromPowerApps, //refers to the Data Source in which we’re creating record.
{
Name: txtInp_Name.Text, //Single line of text
Age: Value(txtInp_Age.Text), //Number
Description: txtInp_Description.Text, //Multiple lines of text
Fees:Value(txtInp_Fees.Text), //Currency type
'Favourite Website':txtInp_FavouriteWebsite.Text //Hyperlink type
}
); //Here "Value" for conversion of Text type to Number.
// Syntax of Patch:- Patch(SourceName, Record)*/
#Explanation of above expression:
Here, we are creating a New Record in SharePoint List, “list_PatchingFromPowerApps” and storing the values passed
in the Text-Inputs controls of the ‘Name’, ‘Age’, ‘Description’, ‘Fees’ and ‘Favourite Website’ columns in Power Apps.
Inside the curly braces{}, and to the left of each colon, we are mentioning the name of the column of the SharePoint
list.
And to the right of each colon, we are mentioning the Text written in the Text Input controls, each column value
separated by comma.
Also, for the column types which store a Number and not Text, we are converting the Text to Number using the
“Value” function. i.e., “Value(TextControl.Text)”
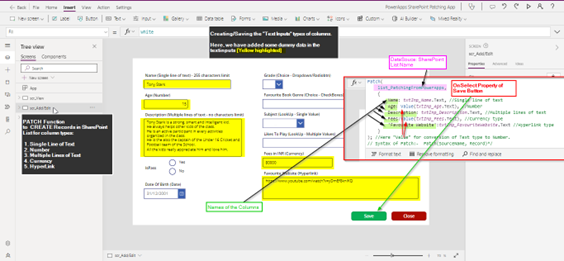
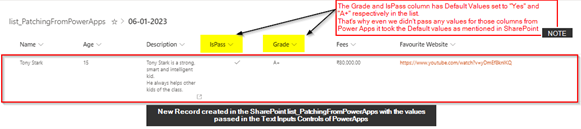
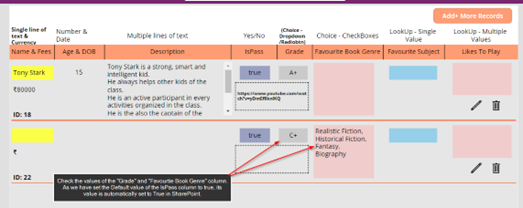
Note: We didn’t pass any values in the radio button of IsPass column and Dropdown of Grade column, but we are
getting the values for those columns because we have set the Default values for those columns as “Yes” and “A+” in
SharePoint respectively.
Close Button and Reset functionality
Put the below code on the OnSelect property of the Close button
Navigate(scr_View); //Navigation to the "scr_View"
Set(gv_Reset, true); //gv_Reset is a variable, which is being referred to in the RESET Property of all the user
input controls on this page.
Set(gv_Reset, false);
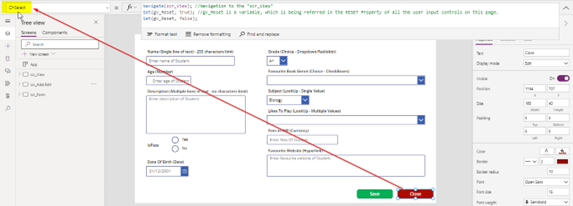
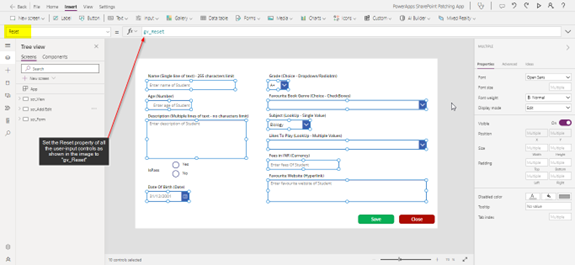
On pressing the Close button, what we want is to navigate back to the scr_View page, and when we switch back to
the scr_Add/Edit page what we want is to reset all the controls to the blanks. That’s the reason why we had to
create the “gv_Reset” variable.
Now press the Close button.
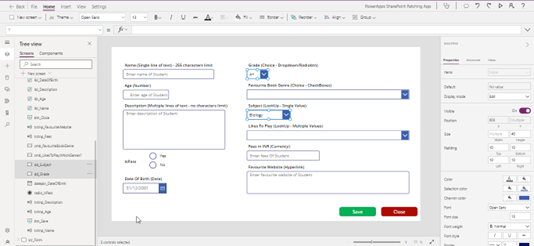
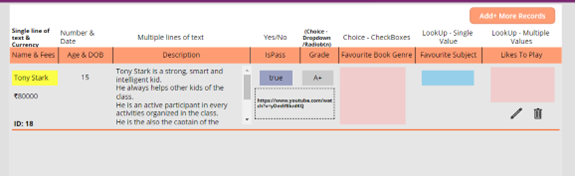
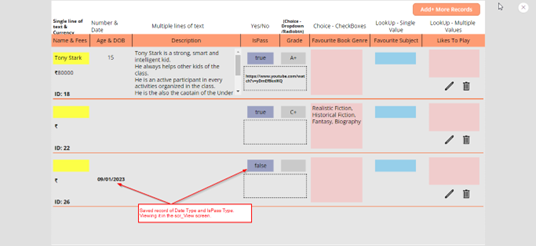
You will be navigated to the scr_View screen, and you can notice the record as shown in the below image.
Now, manually go to the “scr_Add/Edit” screen. You’ll observe all the user input controls will be BLANK.
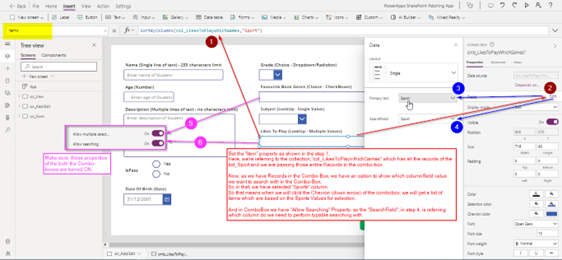
Dealing with Choices Column in Power Apps:
For Dropdowns you have the property of “AllowEmptySelection”.
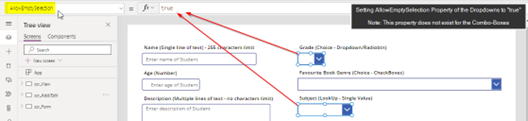
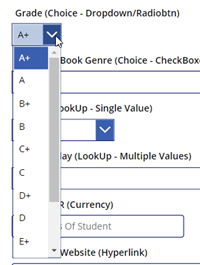

Items will start to appear in the Dropdown and the Combo-Box.
To create a record and to save the Choice type of column, use the below expression.
Patch(
list_PatchingFromPowerApps,
{
Grade: dd_Grade.Selected, //Choice column (dropdown/radiobtn)
'Favourite Book Genre':cmb_FavouriteBookGenre.SelectedItems //Choice column (checkbox
multiselect)
}
);
// Syntax of Patch:- Patch(SourceName, Record)*/
#Explanation of above expression:
Here, we are creating a New Record in SharePoint List, “list_PatchingFromPowerApps” and storing the values
selected in the Choice columns, ‘Grade’ and ‘Favourite Book Genre’ respectively columns in Power Apps.
Inside the curly braces{}, and to the left of each colon, we are mentioning the name of the column of the SharePoint
list.
And to the right of each colon, we are mentioning the selected items of the dropdowns and combo-boxes controls
in the Power Apps, each column value separated by comma
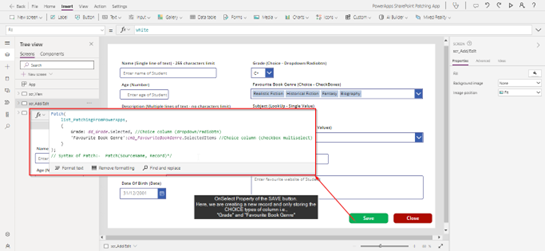
Press the SAVE button followed by the CLOSE button.

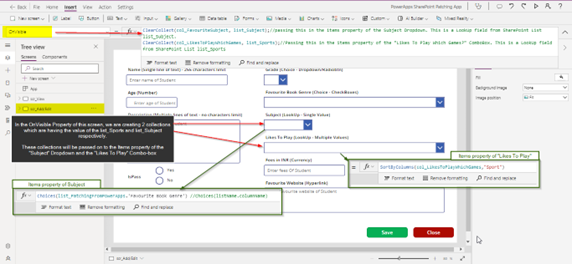
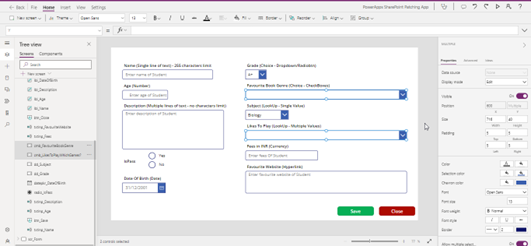
Follow the same steps for “Subject” dropdown.
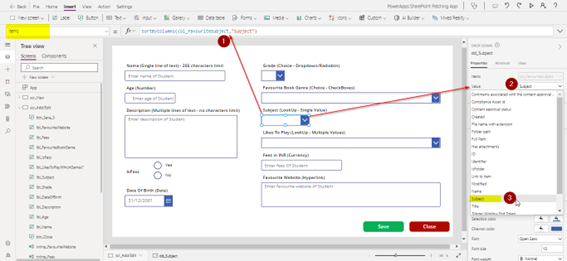
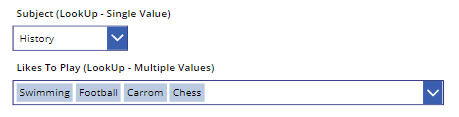
Select the following items in the ‘Subject’ dropdown and the ‘Likes to Play’ combo-box respectively. Refer below
image.
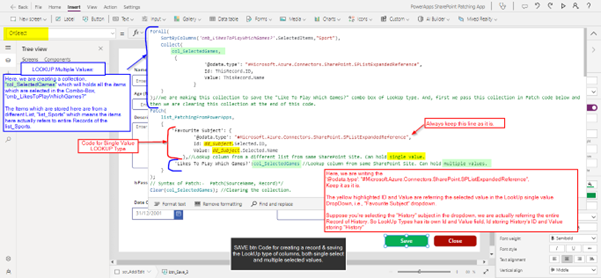
To create a record and to save the LOOKUP types of columns, use the below expression.
ForAll(
SortByColumns('cmb_LikesToPlayWhichGames?'.SelectedItems,"Sport"),
Collect(
col_SelectedGames,
{
'@odata.type': "#Microsoft.Azure.Connectors.SharePoint.SPListExpandedReference",
Id: ThisRecord.ID,
Value: ThisRecord.Name
}
)
);//
We are making this collection to save the ‘Like To Play Which Games?’ combo box of LookUp type. And first we
pass this collection in Patch code below and then we are clearing this collection at the end of this code.
Patch(
list_PatchingFromPowerApps,
{
'Favourite Subject': {
'@odata.type': "#Microsoft.Azure.Connectors.SharePoint.SPListExpandedReference",
Id: dd_Subject.Selected.ID,
Value: dd_Subject.Selected.Subject
},//Lookup column from a different list from the same SharePoint Site. Can hold a single value.
'Likes To PLay Which Games?':col_SelectedGames //Lookup column from same SharePoint Site. Can hold
multiple values.
}
);
// Syntax of Patch:- Patch(SourceName, Record)*/
Clear(col_SelectedGames); //Clearing the collection.
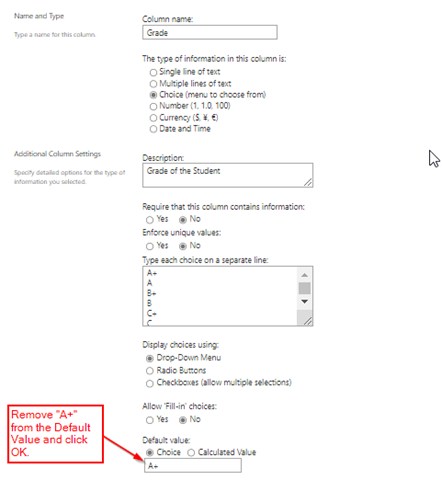
Grade column settings in list settings view of the list_PatchFromPowerApps.
Now turn off the Default Property of the Grade column of SharePoint.

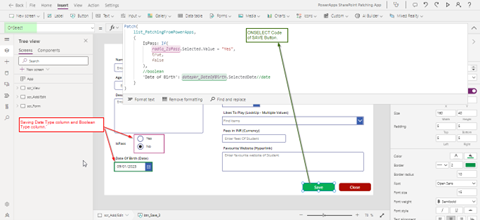
To create a record and to save the Boolean and Date types of columns, use the below expression.
Patch(
list_PatchingFromPowerApps,
{
IsPass: If(
radio_IsPass.Selected.Value = "Yes",
true,
false
),
//boolean
'Date of Birth': datepkr_DateOfBirth.SelectedDate//date
}
)
#Explanation of above expression:
Here, we are creating a New Record in SharePoint List, “list_PatchingFromPowerApps” and storing the values
selected in the Date Picker and Radio Button, ‘IsPass’ and ‘Date of Birth’ respectively columns in Power Apps.
Inside the curly braces, and to the left of each colon, we are mentioning the name of the column of the SharePoint
list.
And to the right of each colon, we are mentioning the selected date of the Date-Picker and radio button control
value in the Power Apps, each column value separated by comma.

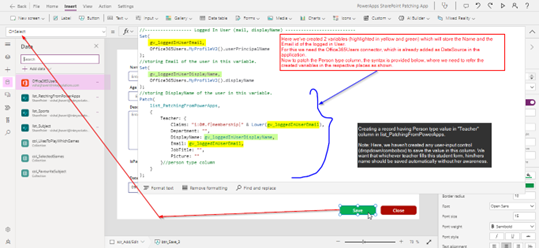
To create a record and to save the Person type column, use the below expression.
//------------------ Logged In User (mail, displayName) ---------------------------
Set(
gv_loggedInUserEmail,
Office365Users.MyProfileV2().userPrincipalName
);
//storing Email of the user in this variable.
Set(
gv_loggedInUserDisplayName,
Office365Users.MyProfileV2().displayName
);
//storing DisplayName of the user in this variable.
Patch(
list_PatchingFromPowerApps,
{
Teacher: {
Claims: "i:0#.f|membership|" & Lower(gv_loggedInUserEmail),
Department: "",
DisplayName: gv_loggedInUserDisplayName,
Email: gv_loggedInUserEmail,
JobTitle: "",
Picture: ""
}//person type column
}
);
#Explanation of above expression:
Here, we are creating a New Record in SharePoint List, “list_PatchingFromPowerApps” and storing the values of
Person Type value in ‘Teacher’ Column, directly without any user-input control involved in this case.
Here, we are taking the help of Office365Users connector to store the Email and Display name of the logged in user,
in 2 different variables.
Also you can avoid this and use User().Email or User().FullName function to fetch the email and name of the logged
in user respectively.
Inside the curly braces, and to the left of each colon, we are mentioning the name of the column of the SharePoint
list.
And to the right of each colon, we are mentioning the syntax to save the Person Type Column, where we have
passed the required Email and Display Name variables respectively.

COMPILED CODE To Save all the fields of the Record: {OnSelect property of SAVE button}
//------------------ Logged In User (mail, displayName) ---------------------------
Set(gv_loggedInUserEmail,Office365Users.MyProfileV2().userPrincipalName); //storing Email of the user in this
variable.
Set(gv_loggedInUserDisplayName,Office365Users.MyProfileV2().displayName); //storing DisplayName of the user in
this variable.
ForAll(
SortByColumns('cmb_LikesToPlayWhichGames?'.SelectedItems,"Sport"),
Collect(
col_SelectedGames,
{
'@odata.type': "#Microsoft.Azure.Connectors.SharePoint.SPListExpandedReference",
Id: ThisRecord.ID,
Value: ThisRecord.Name
}
)
);//
We are making this collection to save the “Like To Play Which Games?” combo box of LookUp type. And, first we
pass this collection in the Patch code below and then we are clearing this collection at the end of this code.
Patch(
list_PatchingFromPowerApps,
{
Name: txtInp_Name.Text, //single line of text
Age: Value(txtInp_Age.Text), //number
Description: txtInp_Description.Text, //multiple lines of text
IsPass: If(radio_IsPass.Selected.Value = "Yes" , true, false), //boolean
'Date of Birth':datepkr_DateOfBirth.SelectedDate, //date
Teacher:
{
Claims: "i:0#.f|membership|" & Lower(gv_loggedInUserEmail),
Department: "",
DisplayName: gv_loggedInUserDisplayName,
Email: gv_loggedInUserEmail,
JobTitle: "",
Picture: ""
}, //person type column
Grade: dd_Grade.Selected, //Choice column (dropdown/radiobtn)
'Favourite Book Genre':cmb_FavouriteBookGenre.SelectedItems, //Choice column (checkbox multiselect)
'Favourite Subject': {
'@odata.type': "#Microsoft.Azure.Connectors.SharePoint.SPListExpandedReference",
Id: dd_Subject.Selected.ID,
Value: dd_Subject.Selected.Name
},//Lookup column from a different list from the same SharePoint Site. Can hold a single value.
'Likes To PLay Which Games?':col_SelectedGames, //Lookup column from same SharePoint Site. Can hold
multiple values.
Fees:Value(txtInp_Fees.Text),
'Favourite Website':txtInp_FavouriteWebsite.Text
}
);
Clear(col_SelectedGames);
CONCLUSION:
So, in this blog (Performing CRUD Operations in Power Apps using any Data Source – Part III) we provided an
overview on different methods to create records in a data source using Power Apps. And we also covered the
extensive use of the PATCH function to create records for columns of any data-type to any data source using Power
Apps
ATM Inspection PowerApp to ease ATM inspection and report generation process.
https://www.inkeysolutions.com/microsoft-power-platform/power-app/atm-inspection
Insert data into Many-to-Many relationship in Dynamics CRM very easily & quickly, using the Drag and drop listbox.
http://www.inkeysolutions.com/what-we-do/dynamicscrmaddons/drag-and-drop-listbox
Comply your Lead, Contact, and User entities of D365 CRM with GDPR compliance using the GDPR add-on.
https://www.inkeysolutions.com/microsoft-dynamics-365/dynamicscrmaddons/gdpr
Create a personal / system view in Dynamics CRM with all the fields on the form/s which you select for a particular entity using the View Creator.
http://www.inkeysolutions.com/what-we-do/dynamicscrmaddons/view-creator
INKEY is your solution partner.
Our focus is to deliver you in-time intelligent innovative solutions ("key") for the problems in hand. Maintaining a quality standard right from the inception of a project is our top most priority.
Our team of talented professionals will execute your projects with dedication and excellence. We take ownership and accountability for the effort that goes into meeting our client’s needs.
Years of experience and proven success of delivering innovative custom solutions.


© All Rights Reserved. Inkey IT Solutions Pvt. Ltd. 2024


[…] In the previous 4 blog parts, we have shown what data source we are using, Data Model View, how to connect to any data source in Power Apps, how to read data from any Data source, how to create records using the Patch method for column of any data type, how to update existing records from any Data source, and deleting a record from Data Source. You can check the third part here. […]
[…] to compare the piece of code with the Save Button Code, which we demonstrated in the Blog Part III of this 5-part Blog series. Lastly, the easiest of all – how to delete a record from any data […]