Power Pages – New Feature with Cloud Flow Integration in Setup Navigation
Microsoft Power Pages has introduced a new feature that allows you to create Cloud Flows (Power Automate Flows) directly from the Power Pages Designer Studio under the Setup navigation. This enhancement simplifies the process of integrating automation into your portal.
With this feature:
- Cloud Flows can now be created and managed directly within Power Pages, eliminating the need to switch between Power Automate and Power Pages.
- These flows are secure by default, and their access can be controlled using web roles, ensuring only authorized users can trigger them.
- After creating the flow, a secure HTTP endpoint (URL) is provided, which can be called directly from JavaScript on the portal pages.
- This streamlines the automation of business processes, such as form submissions, data validations, email notifications, and more.
Below are the steps to create and use power automate flow within power pages
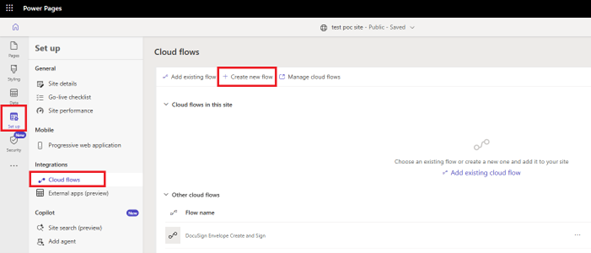
Step 1: In Power Pages Designer, go to Setup > Cloud Flow.
Create a new flow and integrate it with your Power Pages portal.
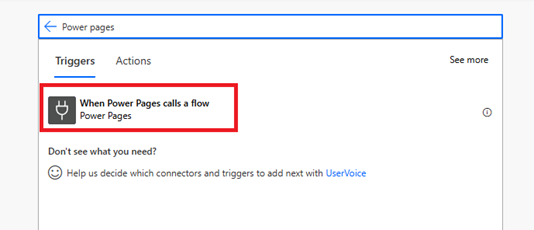
Step 2: Select the trigger “When Power Pages calls a flow”
This trigger allows your Power Automate flow to be invoked directly from the Power Pages portal, typically using JavaScript or form of events.
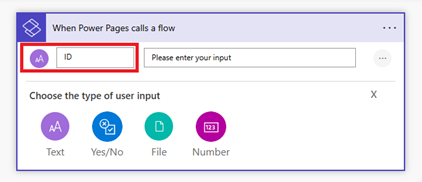
Step 3: The “When Power Pages calls a flow” trigger allows you to define multiple types of user inputs, such as:
- Text
- Yes/No (Boolean)
- File Upload
- Number
You can add input fields directly based on the type of data you want to receive from the portal. These inputs will be available in the flow for further processing.
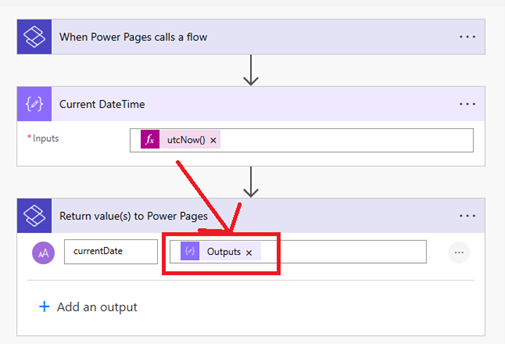
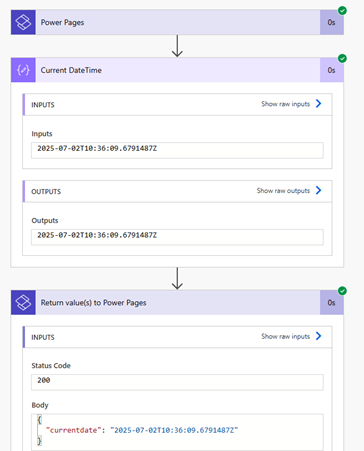
Step 4: Return Response action to Power Pages
Add a Compose action (Example: To get the current date and time) and use the “Respond to Power Pages” action to return the result back to the portal.

Step 5: Return Value
Power Automate flow provides both a trigger (to receive input from Power Pages) and a response action (to return data back to Power Pages).
- The “Respond to Power Pages” action sends the output back to the portal, which can then be handled using JavaScript or used in the portal UI.
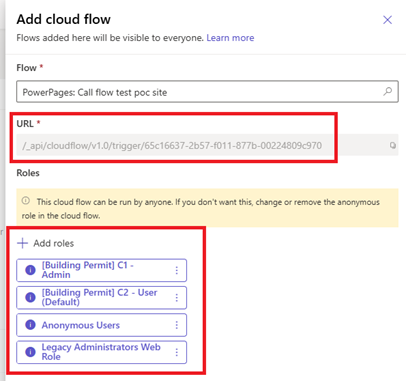
Step 6: Add Cloud Flow to Power Pages
After creating the Cloud Flow in Power Pages Designer, a popup will appear showing:
- Flow URL – This is the HTTP endpoint that can be used to call the flow using JavaScript (AJAX) from your portal.
- Roles – This section allows you to assign specific web roles that are allowed to access and trigger the flow.
Only users with the assigned roles will be able to invoke the flow, ensuring secure and role-based access to your automation.
Step 7: Here’s a full example and explanation using HTML, JavaScript, and CSS to call a Power Automate Cloud Flow from Power Pages and display the response
You will get a complete understanding of the end-to-end process of calling a Power Automate Cloud Flow using JavaScript.
Example:
We created a button labeled Call Flow. When the button is clicked, it is called the Power Automate Cloud Flow, which returns the current date and time. The response from the flow is then displayed on a label positioned below the button.
HTML:
<div class=”container”>
<button onclick=”callFlow()”>Call Flow
</button>
<div class=”response-label” id=”responseLabel”>Response will appear here.</div>
</div>
CSS:
body {
font-family: Arial, sans-serif;
padding: 30px;
}
.container {
max-width: 400px;
}
label {
display: block;
margin-top: 10px;
}
button {
margin-top: 15px;
padding: 10px 20px;
background-color: #0078D4;
color: white;
border: none;
border-radius: 4px;
cursor: pointer;
}
button:hover {
background-color: #005fa3;
}
.response-label {
margin-top: 20px;
font-weight: bold;
color: #333;
}

JavaScript:
function callFlow(){
var URL = “/_api/cloudflow/v1.0/trigger/65c16637-2b57-f011-877b-00224809c970”;
var obj = {
“ID”: 123
};
callPowerPagesPowerAutomate(URL, obj, function success(successResult){
$(‘#responseLabel’).text(successResult.currentdate);
}, function error(errorResult){
alert(“error”);
});
}
function callPowerPagesPowerAutomate(URL, entityDataJsonObject, successCallBack, errorCallBack) {
var url = null;
url = getWebSiteMainURL() + URL;
var payload = {};
payload.eventData = JSON.stringify(entityDataJsonObject);
// Make AJAX request
shell.ajaxSafePost({
type: “POST”,
contentType: “application/json”,
url: URL,
data: JSON.stringify(payload),
processData: false,
global: false
})
.done(function (response) {
if (typeof onSuccess === ‘function’) {
successCallBack(JSON.parse(response));
} else {
successCallBack(JSON.parse(response));
}
})
.fail(function (error) {
if (typeof onError === ‘function’) {
errorCallBack(error);
} else {
errorCallBack(error);
}
});
function getWebSiteMainURL() {
var mainUrl = window.location.origin;
return mainUrl;
}
}
We created a common function called Power Automate flow. This function requires four parameters:
- The URL of the flow.
- An object containing the data to pass into the flow trigger inputs.
- Success callback
- Error callback
The function, named callPowerPagesPowerAutomate, is a reusable method that handles the HTTP request to the Power Automate flow.
The callFlow function uses this common method to call the flow with the required inputs, handle the response, and display the result in the label.
Step 8: Flow result
Step 9: Output with data & time

Benefits:
- Simplified Development Experience
- Automatic Secure Integration
- Auto-generated HTTP Endpoint
- Enhanced Security
Conclusion
In this walkthrough, we show how to create and call a Power Automate Cloud Flow directly from Power Pages using JavaScript.
By using the built-in “When Power Pages calls a flow” trigger and the “Respond to Power Pages” action, we can securely send and receive data between the portal and Power Automate.
We also implemented a reusable JavaScript function to simplify flow calls and display the results (current date and time) dynamically on the page.
This approach makes automation in Power Pages simple, secure, and highly extensible.