
Greetings, BI enthusiasts!
When working with Power BI reports and handling numerical data with multiple hierarchies, the Matrix visual is often the go-to choice. It seamlessly accommodates hierarchical data with proper modeling, allowing the use of measures as rows. However, what if you need to display measures as rows with specified indentations, sorting, and font styles? It might sound like a challenging task, but we recently encountered such a requirement and found a clever workaround to make it happen.
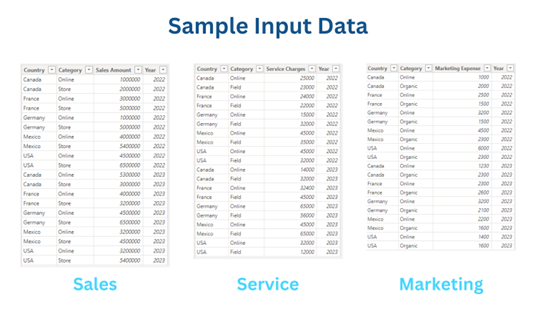
Sample Input Data and Desired Result:

Let’s dive into the steps to achieve this:
Step 1: Creating Required Dimension Table and Modeling
Begin by creating a two-dimensional table, such as Year and Country. Establish the necessary relationships as illustrated in the provided snapshot.
 Step 2: Create Measures to Calculate Values
In this step, create the required measures that will calculate the values to be displayed.
Total Sales =
SUM(Sales[Sales Amount])

Total Online Sales =
CALCULATE(
    [Total Sales],
    Sales[Category] = "Online"
)

Total In-store Sales =
CALCULATE(
    [Total Sales],
    Sales[Category] = "Store"
)

Total Service Charges =
SUM(Service[Service Charges])

Total Online Service Charges =
CALCULATE(
    [Total Service Charges],
    Service[Category] = "Online"
)

Total Field Service Charges =
CALCULATE(
    [Total Service Charges],
    Service[Category] = "Field"
)

Total Marketing Expense =
SUM(Marketing[Marketing Expense])

Total Organic Marketing Expense =
CALCULATE(
    [Total Marketing Expense],
    Marketing[Category] = "Organic"
)

Total Online Marketing Expense =
CALCULATE(
    [Total Marketing Expense],
    Marketing[Category] = "Online"
)
Step 3: Creating Table with Required Hierarchy
Build a table named “Matrix” with columns like “Parent Category,” “Child Category,” “Parent Sort,” and “Child Sort.” To apply font styles to the “Child Category,” utilize an online tool like [boldtextgenerator.co](https://www.boldtextgenerator.co/) and paste the generated style directly into the table.
To add indentation in front of required values we will simple add white space(“⠀⠀⠀”) before the text.
Parent Category column contains the values which we want on first level of hierarchy while child category column contains values which are calculated using measures created in previous step.
“Parent Sort” and “Child Sort” column will be used to sort the “Parent Category” and “Child Category” column.

Power Query for Matrix Table:
let
    Source = Table.FromRows(Json.Document(Binary.Decompress(Binary.FromText("i45WCk7MSS1W0lH6MHfCZCBeAcRrgXgWEC9VABKTYBwgngfEa4BqDcE4Vgeh+9GCBgj6MHfi7g9zJ00A4qlA3ATEvUBjJm4DMvpBHCDugrLbQBK7YKpAAkA8BWq+EWnmbwCZqQvSD5UBqZhMyBJjiCWpRWWZyakEAgHk+dVAvB6IFwHxHJAYSBJo8ISFUNUgBQuQQsoIiE3QLKEsrNqg/poOlWyBSa4CMjqhxoAUdCD5FeQMU1KdsRZqQxvUKa0UO8EM7ATfxKLs1JLMvHQ8Ad6DFJ5LoOG5Fhrwy0FhDFIEtHfCRiBeCVUAklgDYoNjVkfJHMM6ooIe5vImaNCDvQiS3ILktR6o16YixVEHSBHQAZNmAvFEqIJ+aJpsgzrKgjxHYU0PVHGQpVJsLAA=", BinaryEncoding.Base64), Compression.Deflate)), let _t = ((type nullable text) meta [Serialized.Text = true]) in type table [#"Parent Category" = _t, #"Child Category" = _t, #"Parent Sort" = _t, #"Child Sort" = _t]),
    #"Changed Type" = Table.TransformColumnTypes(Source,{{"Parent Category", type text}, {"Child Category", type text}, {"Parent Sort", Int64.Type}, {"Child Sort", Int64.Type}})
in
    #"Changed Type"
Step 4: Sorting the Parent and Child Category Column
Sort the “Parent Category” column by “Parent Sort” and the “Child Category” column by “Child Sort.”

Step 5: Creating a Measure for Matrix Visualization
The key to bringing the matrix to life is creating a measure. The DAX for this measure involves using a SWITCH function based on the selected value from the “Child Category.”
Value =
SWITCH(
    TRUE(),
    SELECTEDVALUE(Matrix[Child Category]) = "𝐓𝐨𝐭𝐚𝐥 𝐌𝐚𝐫𝐤𝐞𝐭𝐢𝐧𝐠 𝐄𝐱𝐩𝐞𝐧𝐬𝐞", [Total Marketing Expense],
    SELECTEDVALUE(Matrix[Child Category]) = "⠀⠀⠀𝑻𝒐𝒕𝒂𝒍 𝑶𝒏𝒍𝒊𝒏𝒆 𝑴𝒂𝒓𝒌𝒆𝒕𝒊𝒏𝒈 𝑬𝒙𝒑𝒆𝒏𝒔𝒆", [Total Online Marketing Expense],
    SELECTEDVALUE(Matrix[Child Category]) = "⠀⠀⠀𝑻𝒐𝒕𝒂𝒍 𝑶𝒓𝒈𝒂𝒏𝒊𝒄 𝑴𝒂𝒓𝒌𝒆𝒕𝒊𝒏𝒈 𝑬𝒙𝒑𝒆𝒏𝒔𝒆", [Total Organic Marketing Expense],
    SELECTEDVALUE(Matrix[Child Category]) = "𝐓𝐨𝐭𝐚𝐥 𝐒𝐚𝐥𝐞𝐬", [Total Sales],
    SELECTEDVALUE(Matrix[Child Category]) = "⠀⠀⠀𝑻𝒐𝒕𝒂𝒍 𝑰𝒏-𝒔𝒕𝒐𝒓𝒆 𝑺𝒂𝒍𝒆𝒔", [Total In-store Sales],
    SELECTEDVALUE(Matrix[Child Category]) = "⠀⠀⠀𝑻𝒐𝒕𝒂𝒍 𝑶𝒏𝒍𝒊𝒏𝒆 𝑺𝒂𝒍𝒆𝒔", [Total Online Sales],
    SELECTEDVALUE(Matrix[Child Category]) = "𝐓𝐨𝐭𝐚𝐥 𝐒𝐞𝐫𝐯𝐢𝐜𝐞 𝐂𝐡𝐚𝐫𝐠𝐞𝐬", [Total Service Charges],
    SELECTEDVALUE(Matrix[Child Category]) = "⠀⠀⠀𝑻𝒐𝒕𝒂𝒍 𝑭𝒊𝒆𝒍𝒅 𝑺𝒆𝒓𝒗𝒊𝒄𝒆 𝑪𝒉𝒂𝒓𝒈𝒆𝒔", [Total Field Service Charges],
    SELECTEDVALUE(Matrix[Child Category]) = "⠀⠀⠀𝑻𝒐𝒕𝒂𝒍 𝑶𝒏𝒍𝒊𝒏𝒆 𝑺𝒆𝒓𝒗𝒊𝒄𝒆 𝑪𝒉𝒂𝒓𝒈𝒆𝒔", [Total Online Service Charges]
)
Let’s try to understand one statement form above measure
SELECTEDVALUE(Matrix[Child Category]) = “𝐓𝐨𝐭𝐚𝐥 𝐌𝐚𝐫𝐤𝐞𝐭𝐢𝐧𝐠 𝐄𝐱𝐩𝐞𝐧𝐬𝐞”, [Total Marketing Expense]
In the above statement if the value of Child Category column plotted in matrix is equal to “𝐓𝐨𝐭𝐚𝐥 𝐌𝐚𝐫𝐤𝐞𝐭𝐢𝐧𝐠 𝐄𝐱𝐩𝐞𝐧𝐬𝐞” then the value calculated from [Total Marketing Expense] measure will be displayed in front of “𝐓𝐨𝐭𝐚𝐥 𝐌𝐚𝐫𝐤𝐞𝐭𝐢𝐧𝐠 𝐄𝐱𝐩𝐞𝐧𝐬𝐞”.
Same logic is used for other values which are to be displayed.
Note: The values that we are comparing should exactly match the value that we have entered in a Matrix Table (including indentations and font style).
Step 6: Plotting the Matrix
With everything prepared, select a matrix visual and plot “Parent Category” and “Child Category” from the “Matrix” table as rows, “Country” from the “Dim Country” table in columns, and the created “Value” measure in the Values field.

Step 7: Formatting our Matrix
Format the matrix visual to meet the specific requirements. Highlight the blank rows representing Parent Category and turn off the “Row subtotals” property to exclude the total row.


Conclusion:
Through this simple workaround, we’ve successfully achieved the goal of plotting measures as rows with indentation in Power BI, overcoming the limitations of existing functionalities. This technique adds flexibility to your reporting capabilities, ensuring a more customized and visually appealing representation of hierarchical data.
Know the number of records in any Dataverse entity or table.
https://www.inkeysolutions.com/entity-record-counter
ATM Inspection PowerApp to ease ATM inspection and report generation process.
https://www.inkeysolutions.com/microsoft-power-platform/power-app/atm-inspection
Insert data into Many-to-Many relationship in Dynamics CRM very easily & quickly, using the Drag and drop listbox.
http://www.inkeysolutions.com/what-we-do/dynamicscrmaddons/drag-and-drop-listbox
Comply your Lead, Contact, and User entities of D365 CRM with GDPR compliance using the GDPR add-on.
https://www.inkeysolutions.com/microsoft-dynamics-365/dynamicscrmaddons/gdpr
Create a personal / system view in Dynamics CRM with all the fields on the form/s which you select for a particular entity using the View Creator.
http://www.inkeysolutions.com/what-we-do/dynamicscrmaddons/view-creator
INKEY is your solution partner.
Our focus is to deliver you in-time intelligent innovative solutions ("key") for the problems in hand. Maintaining a quality standard right from the inception of a project is our top most priority.
Our team of talented professionals will execute your projects with dedication and excellence. We take ownership and accountability for the effort that goes into meeting our client’s needs.
Years of experience and proven success of delivering innovative custom solutions.


© All Rights Reserved. Inkey IT Solutions Pvt. Ltd. 2024


Leave a Reply